(Last Updated 7/17/24)
If you have a maximum allowed capacity for your event (ex. 500 attendees) , and if you plan to offer multiple different ticket types (ex. adult, child, and senior), then a shared inventory may be a good option for your event.
With a shared inventory, you can instruct PromoTix to only sell a maximum number of tickets. For example: regardless of how many adult, child, and senior tickets are sold, PromoTix will automatically disable your ticket sales once the set maximum is reached.
Follow this guide to learn how to use the shared inventory feature.
1. Click on any Live event

Click on any Live event that you would like to create a shared inventory pool for.
NOTE: shared inventories can only be created once your event is published.
2. Click on the "Ticket types" tab
.png?width=1080&height=473&name=Something%20new%201%20(1).png)
Navigate to the Ticket types tab under Event settings.
3. Click on the "Add shared inventory" button

Click on the "Add shared inventory" button.
NOTE: the shared inventory feature will only appear once you have created at least two ticket types.
4. Choose which tickets will be part of the shared inventory
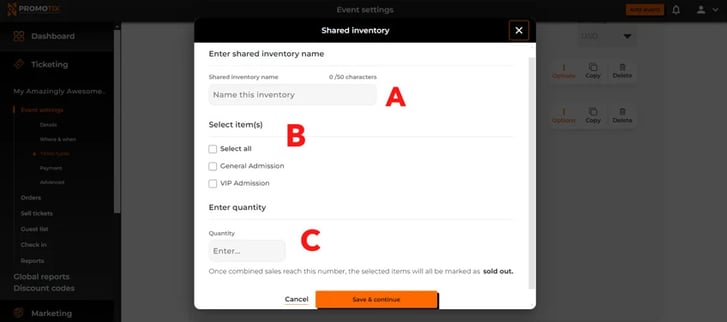
Here you will choose which ticket types and/or add-ons will be included in the shared inventory:
- A 👉 Name your shared inventory.
- B 👉 Choose which ticket types and/or add-ons will be included in the shared inventory.
- C 👉 Set the maximum quantity that can be sold across all of the selected ticket types and/or add-ons. NOTE: once combined sales reach this number, the selected items will all be marked as sold out.
Be sure to click "Save & continue to save.
NOTE: up to two shared inventories can be created per event.