

(Last Updated 7/7/21)
This guide will teach you how to create social media templates for your ambassadors on PromoTix to share and promote your events.
1. Click on Your Ambassador Programs Tab
.png?width=729&height=331&name=Screenshot%20(243).png)
2. Click on "Social Content"
.png?width=727&height=331&name=Screenshot%20(244).png)
3. Click on "Create New Template"
.png?width=1648&height=716&name=Screenshot%20(245).png)
NOTE: The Professional Package is required in order to create social post templates. If you do not have the Professional Package activated, you will be asked to activate it in order to create social post templates.
NOTE: Once you've created a social post template, you can edit or delete it on this screen.
4. Select Ambassador Program(s)
.png?width=727&height=326&name=Screenshot%20(246).png)
Select the ambassador program(s) that you would like to make your new social post template shareable on. You must select at least one ambassador program in order to create a social post template. Then, click "Next."
Once on the next screen, select which platform (Facebook, Twitter, or Instagram) that you would like to create a template for.
5. Create a Facebook Template
-1.png?width=727&height=327&name=Screenshot%20(247)-1.png) Here is how you create a Facebook social post template (make sure that "Facebook" is selected at the top of the screen):
Here is how you create a Facebook social post template (make sure that "Facebook" is selected at the top of the screen):
- A 👉 Enter in a name for your social post template
- B 👉 Enter in a caption for your social post template
- C 👉 Enter in a link for your social post template
In the "Template Link" field, we recommend pasting in a link to one of your existing Facebook posts. If you do this, when ambassadors share your template on PromoTix, it will count as a "share" on your existing Facebook post, which is great for Facebook's algorithm.
To paste in the link to one of your existing Facebook posts:
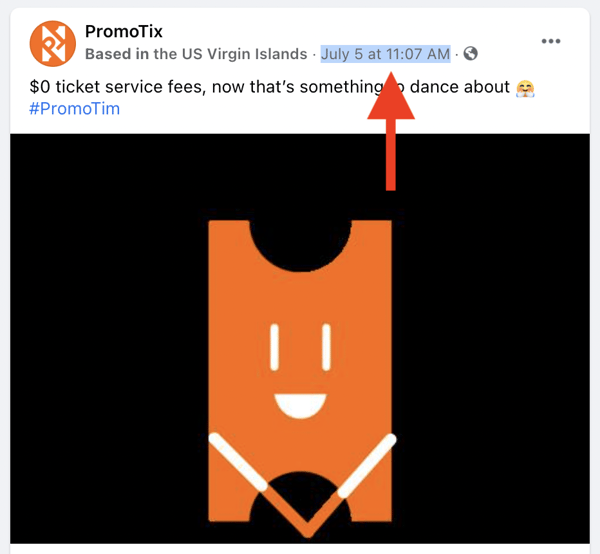
- Locate the Facebook post that you would like your ambassadors to share
- Right click on the date & time in the post (shown below)
- Copy the link to the Facebook post
- Paste that link into the "Template Link" field on PromoTix
 Once you're done, click on "Save Template."
6. Create a Twitter Template
.png?width=727&height=326&name=Screenshot%20(248).png)
Here is how you create a Twitter social post template (make sure that "Twitter" is selected at the top of the screen):
- A 👉 Upload an image for your social post template
- B 👉 Enter in a name for your social post template
- C 👉 Enter in a caption for your social post template
- D 👉 Enter in a link for your social post template
In the "Template Link" field, we suggest pasting in the link to your event page, or to the checkout screen for your event.
Once you're done, click on "Save Template."
7. Create an Instagram Template
.png?width=727&height=322&name=Screenshot%20(249).png)
Here is how you create an Instagram social post template (make sure that "Instagram" is selected at the top of the screen):
- A 👉 Upload an image for your social post template
- B 👉 Enter in a name for your social post template
- C 👉 Enter in a caption for your social post template
Once you're done, click on "Save Template."

