

(Last Updated 1/19/21)
Airmeet does not support RTMP, which means it cannot be used with our secured live streaming platform PromoStream. However, you can still sell tickets to your Airmeet event on PromoTix!
Read below to find out how.
1. Click on "+ New Event"
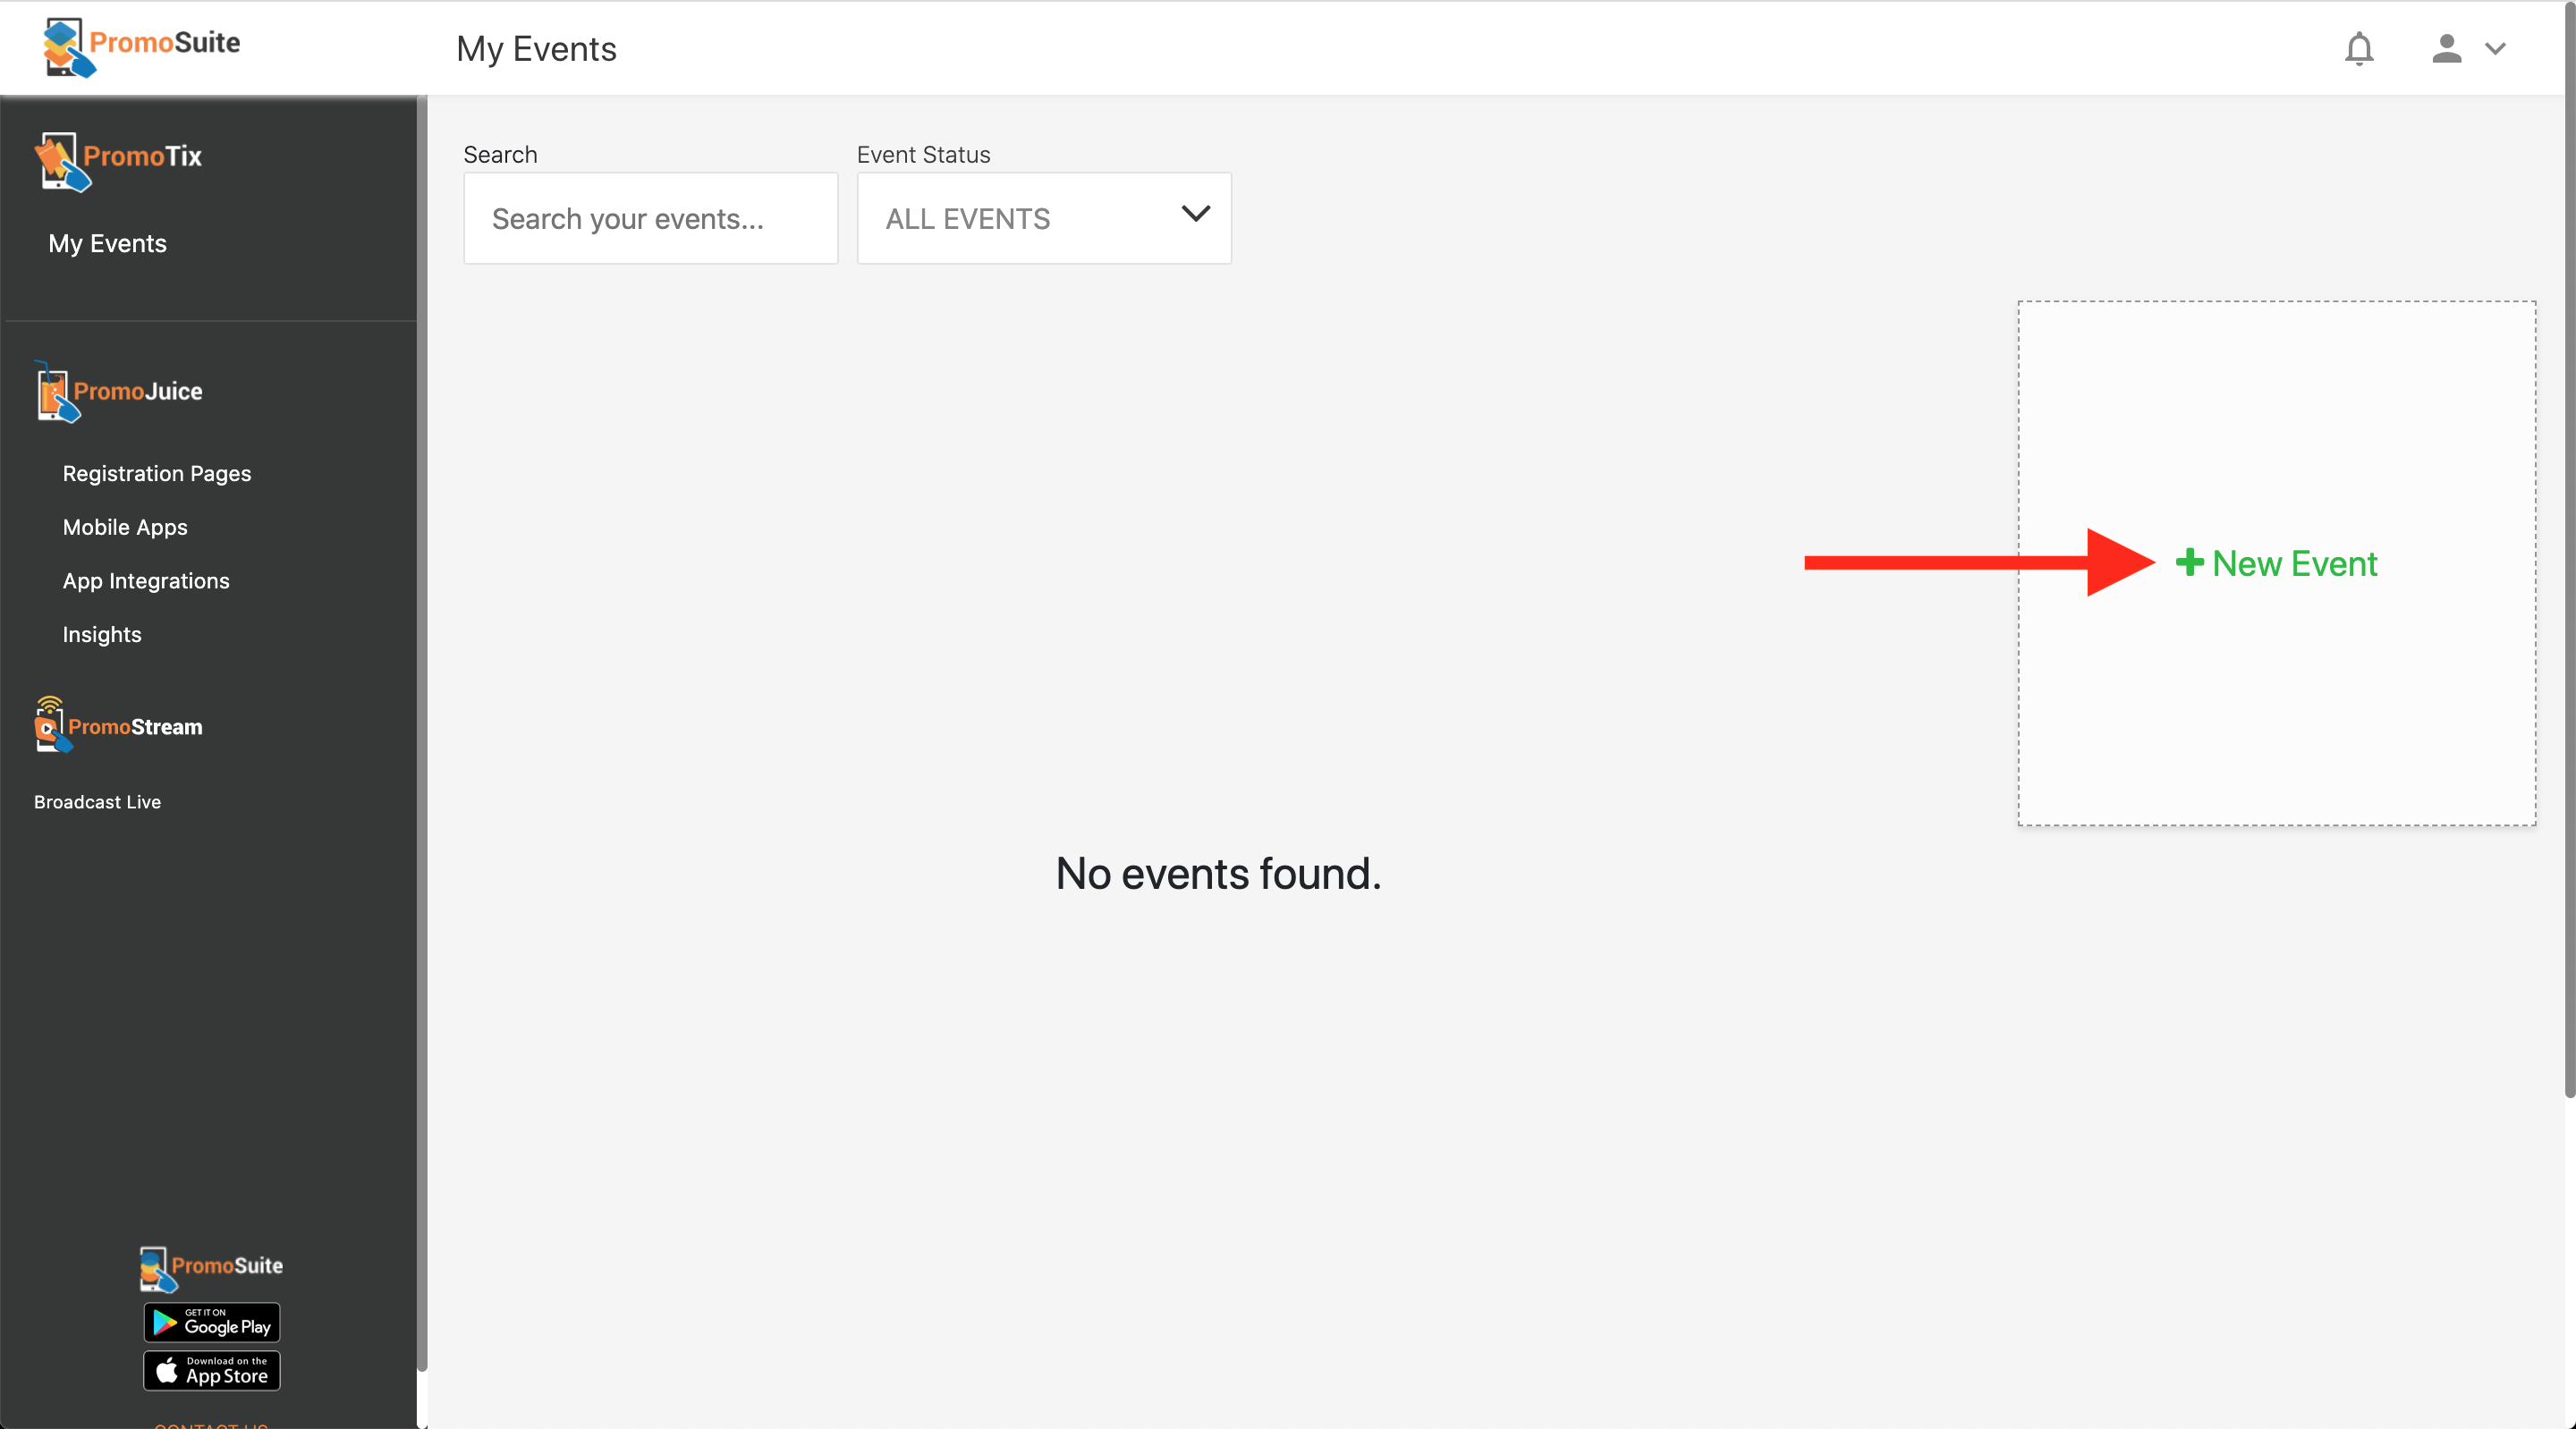
Click on the "+ New Event" button to start creating your event.
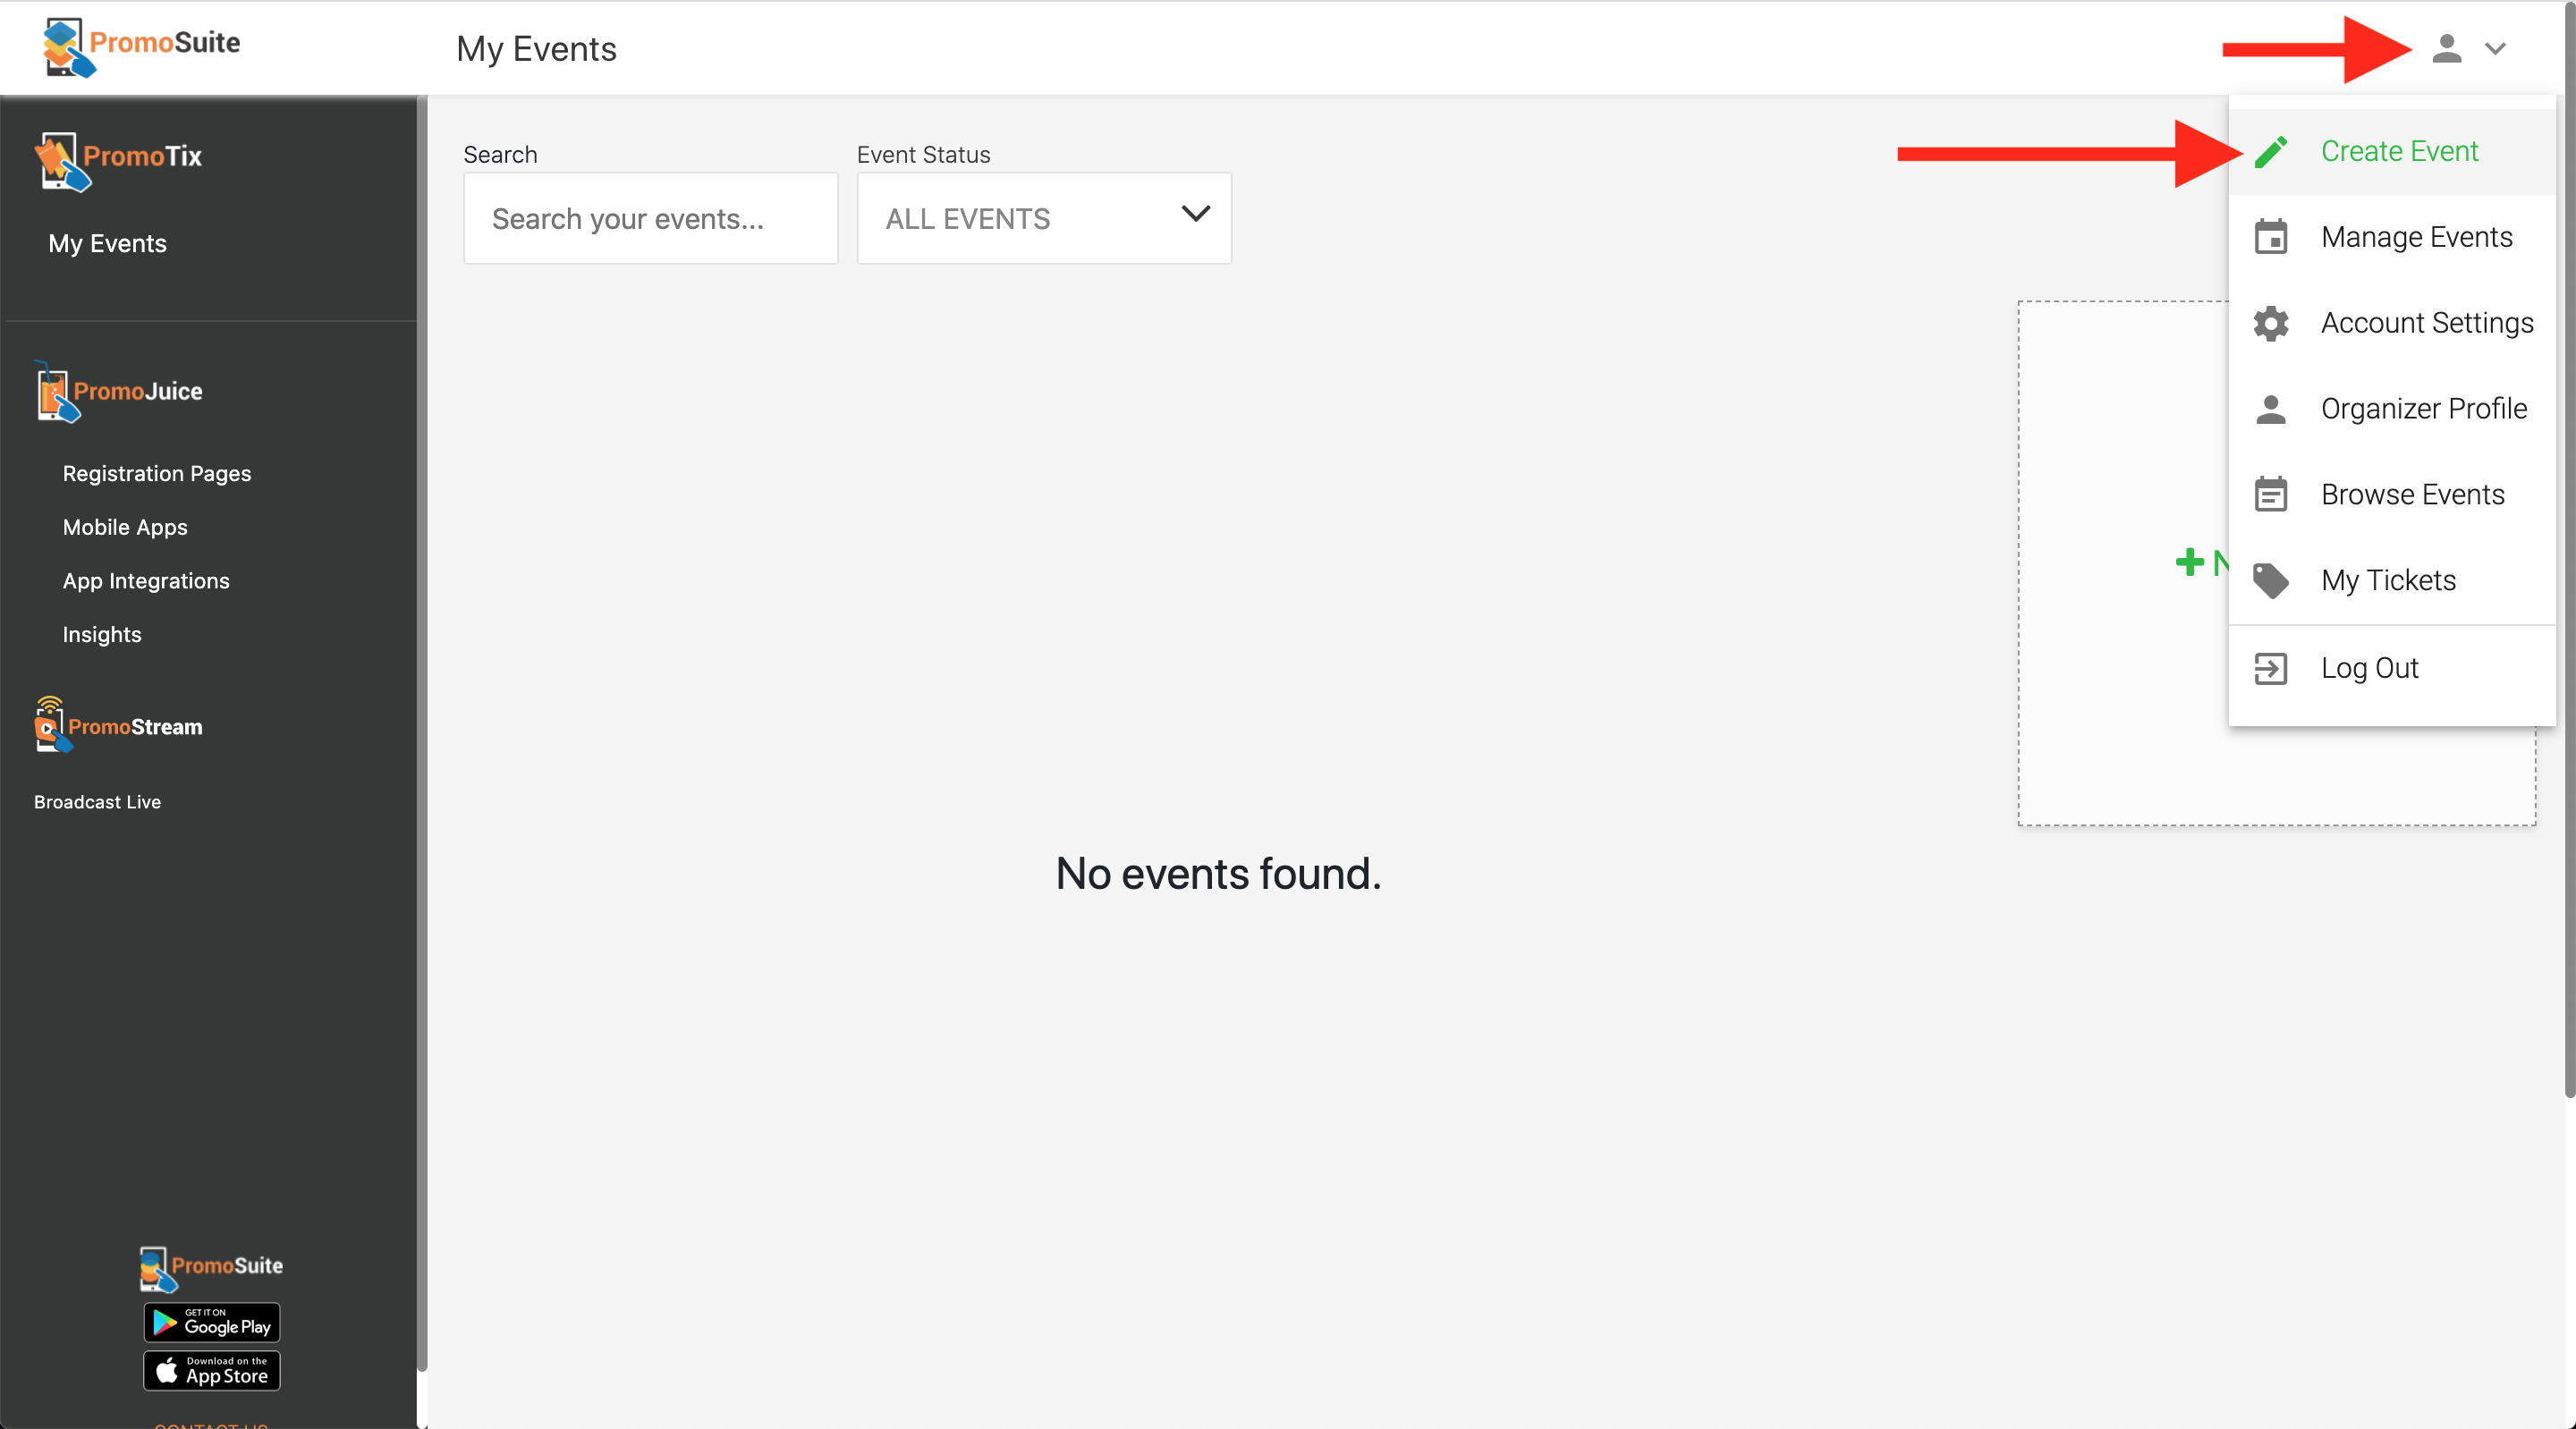
TIP: You can also create a new event using the method below:
2. Fill Out Your Event's Details
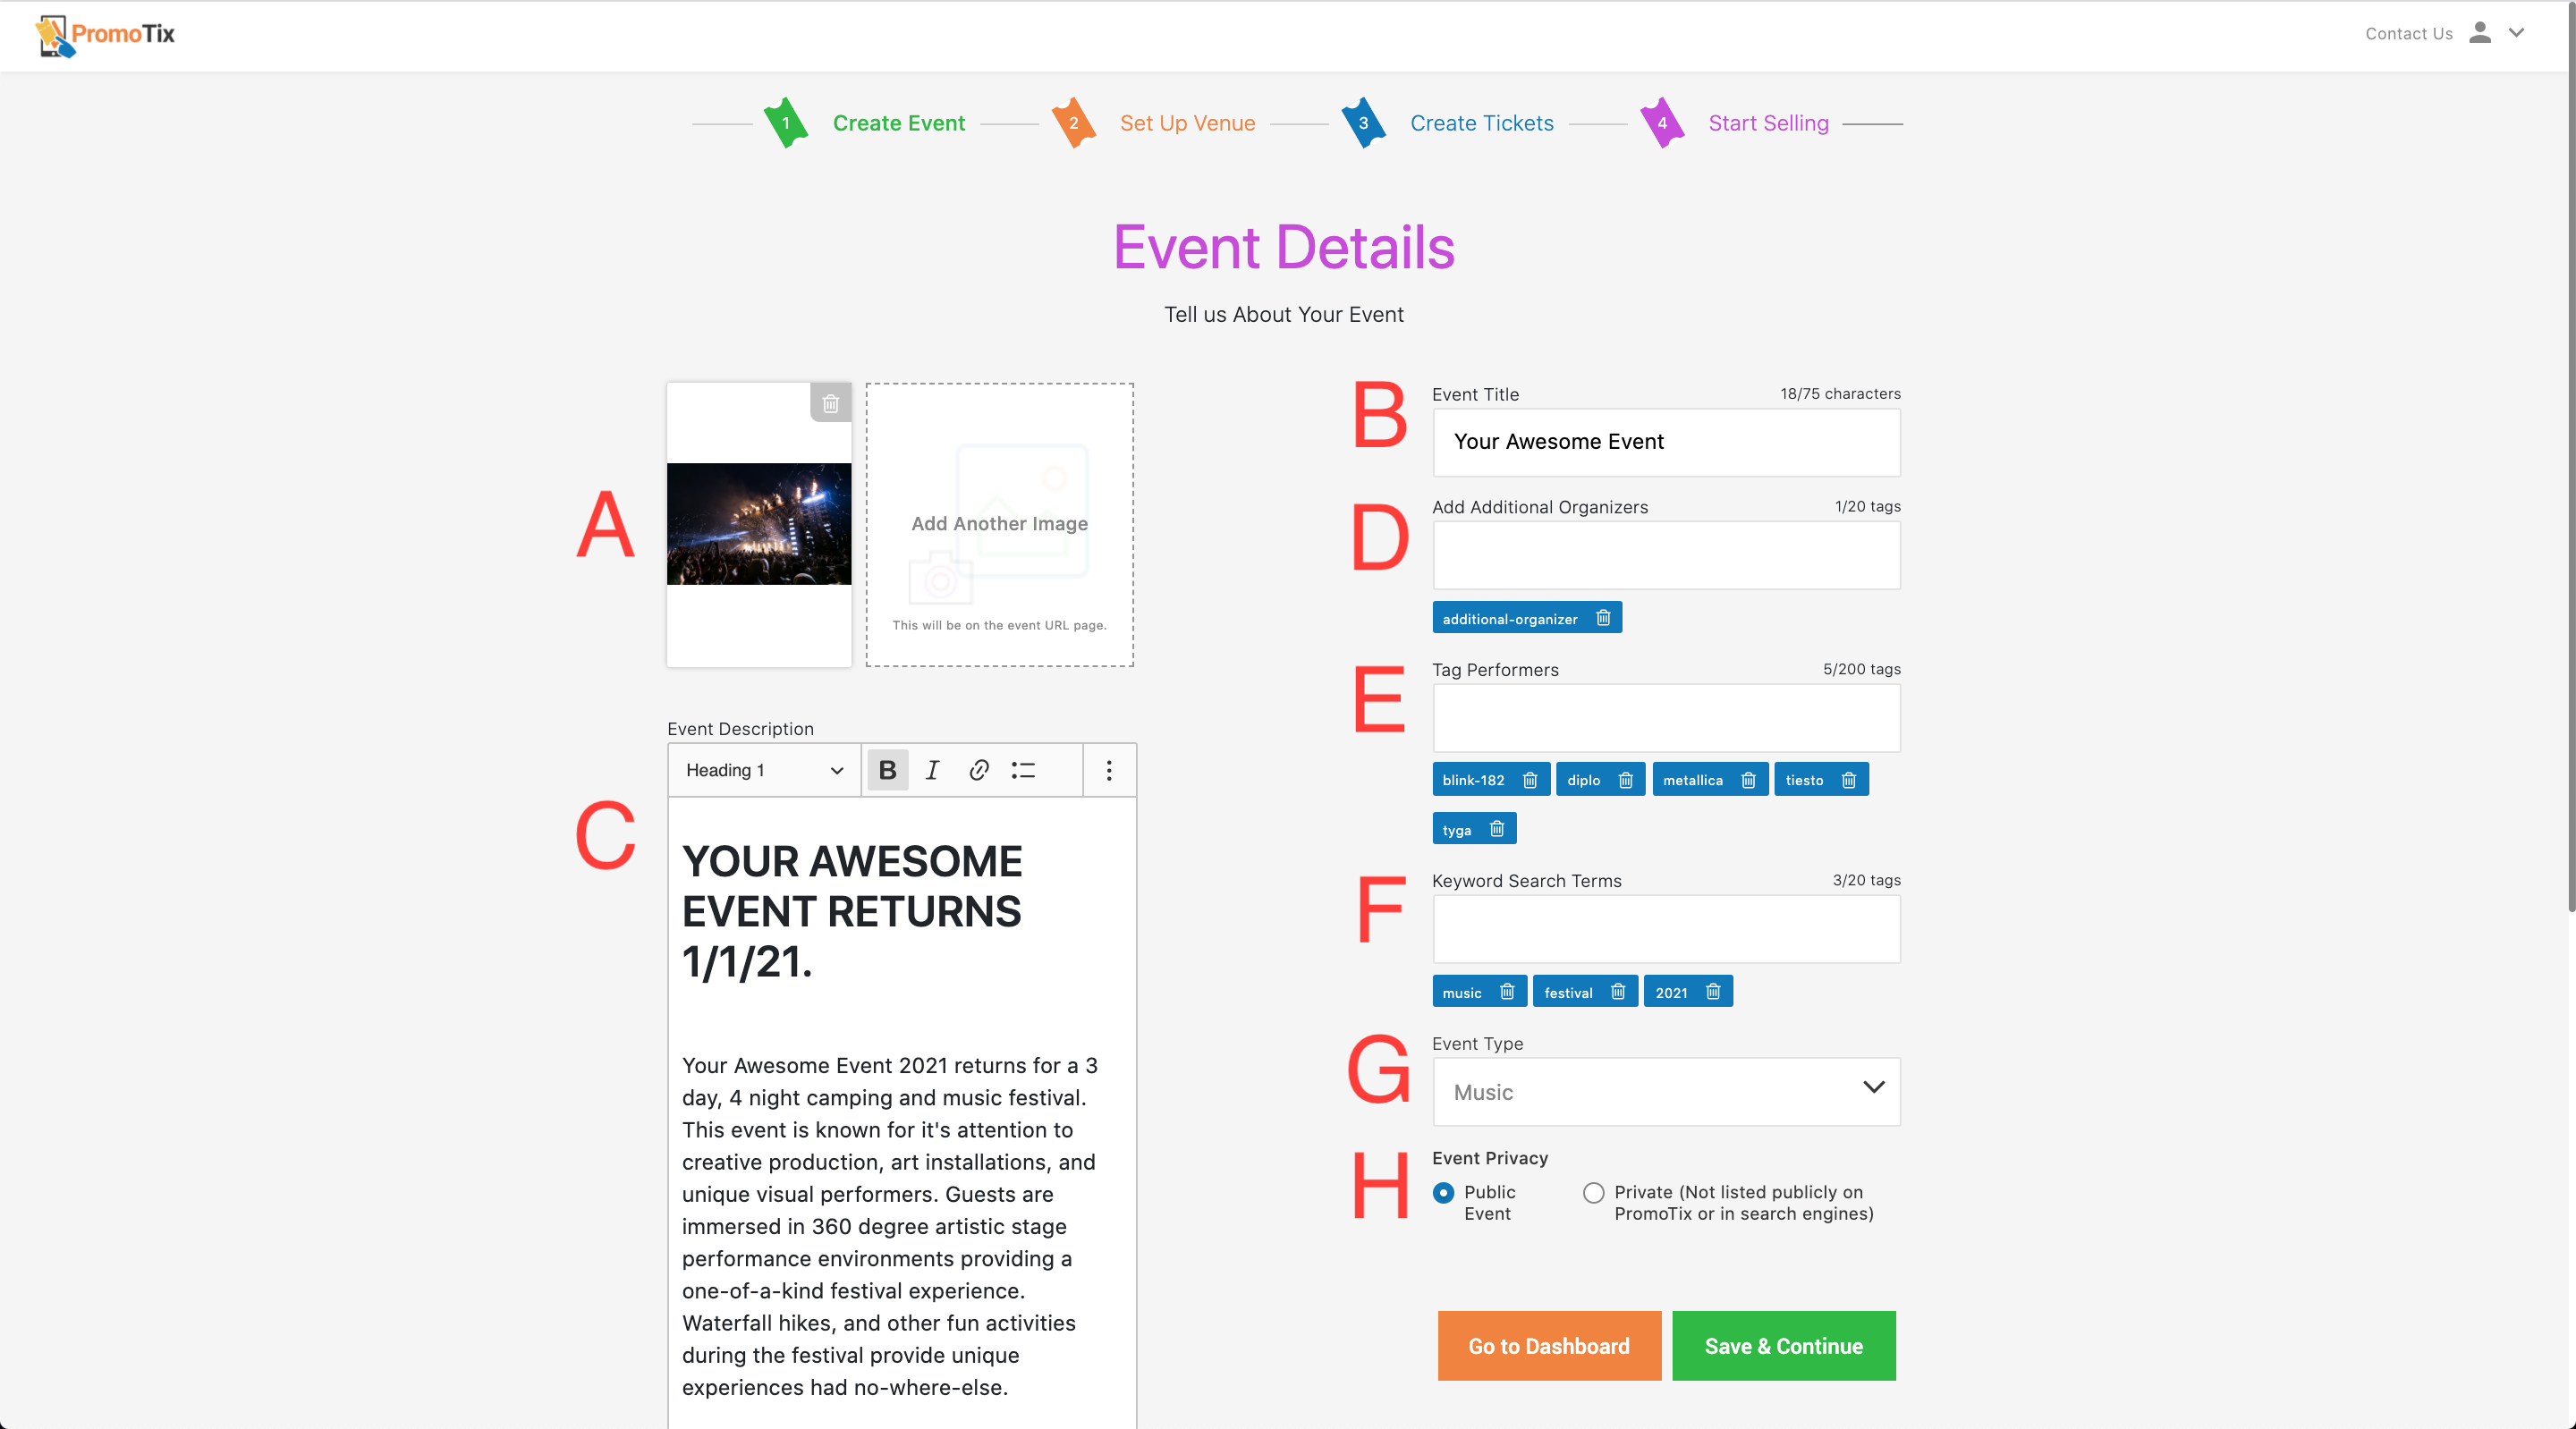 Add some basic details for your event. You can add a title, upload images, write a detailed description, and more. Once you're done, click on the "Save & Continue" button.
-
A 👉 Upload one or several images for your event
-
B 👉 Write a catchy title for your event
-
C 👉 Write a detailed description (optional)
-
D 👉 If your event has co-producers, you can tag them here (optional)
-
E 👉 If your event has performers or speakers, you can tag them here (optional)
-
F 👉 Tag a few popular keywords to help attendees find your event (optional)
-
G 👉 Choose the category that best matches your event
-
H 👉Set your event to "Public" if you want more people to find your event online and on PromoTix!
3. Select the "Unsecured Streaming" Option

On the "When & Where" tab of your event setup screen:
- A 👉 Under the "Venue" dropdown menu, select "Unsecured Streaming".
- B 👉 Your Airmeet will be pasted into this field (see next step for instructions on how to locate your Airmeet link). Attendees who purchase tickets will receive this link in their inbox.
Set the dates and times for your event in the remaining fields, and once you're done, see the next step for instructions on how to locate your Airmeet link.
TIP: Use the "+ Add another day" button to add multiple days to your live stream.
TIP: If your event spans continuously over multiple days, click on the "Past Midnight" checkbox(es).
NOTE: At the time of this writing, PromoTix's virtual ticket fee for Unsecured Streaming events is $0.59 per ticket sold. This fee will be deducted automatically from your future ticket sales.
4. Paste Your Airmeet Link Into PromoTix
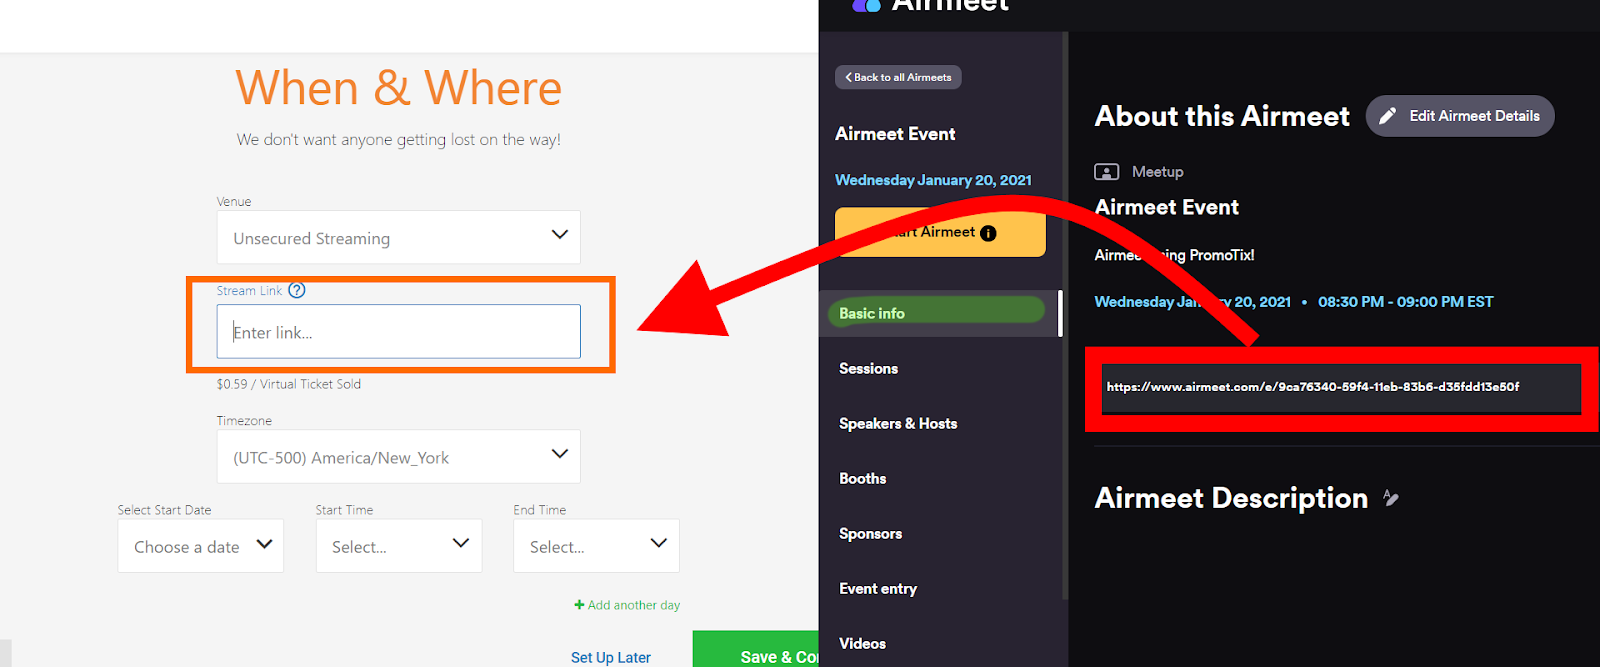
Your Airmeet link is located in the "Basic Info" section of your Airmeet details. Copy and paste this link into the "Stream Link" field on PromoTix as shown in Step 3.
5. Adjust Airmeet Event Entry Settings (Recommended)
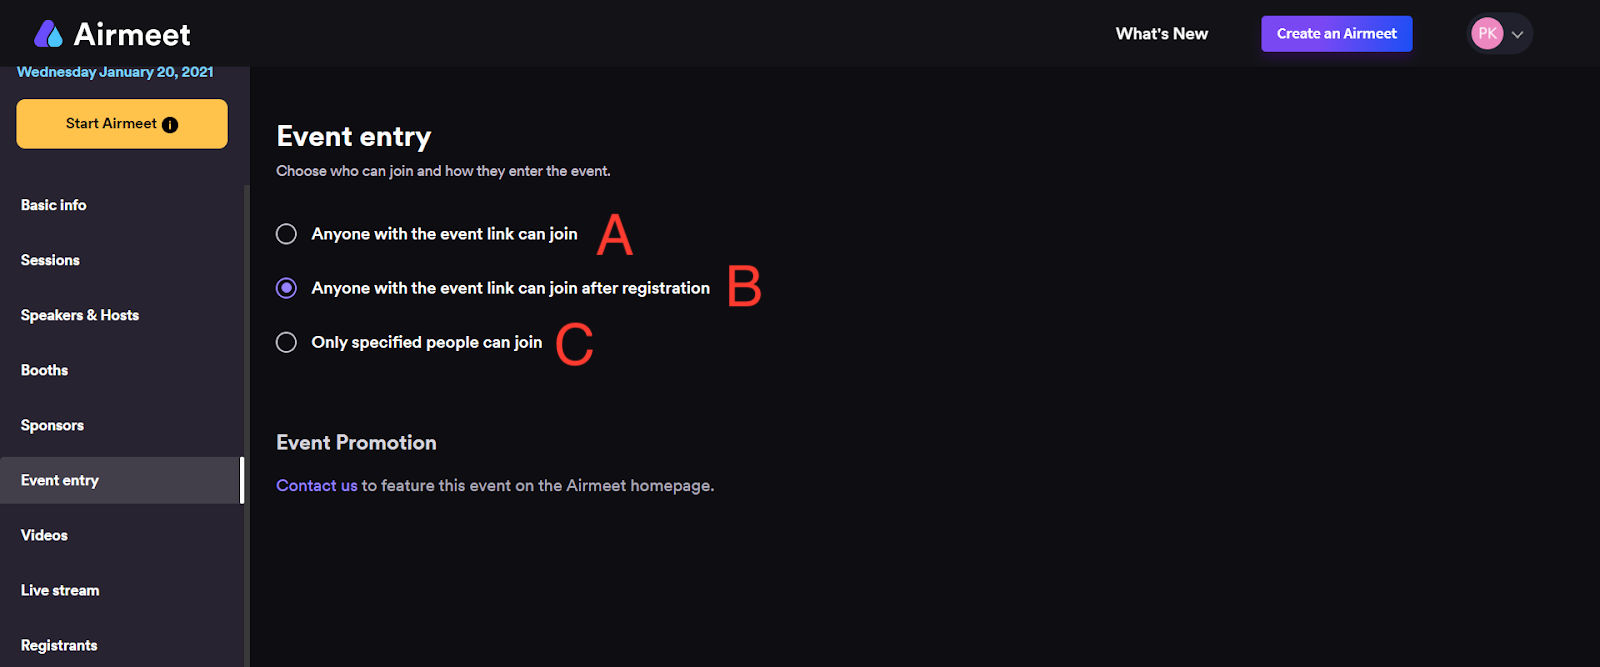
You may want to change your Airmeet’s "Event entry" settings depending on how secured you would like your event to be:
- A 👉 Anyone who has your Airmeet event link can join the stream. This is the least secured option.
- B 👉 This is the default setting. After purchasing a ticket on PromoTix, your attendees will be required to register for an Airmeet account in order to attend the event. Note that people who have not purchased a ticket on PromoTix will still able to register, which means this option is also unsecured.
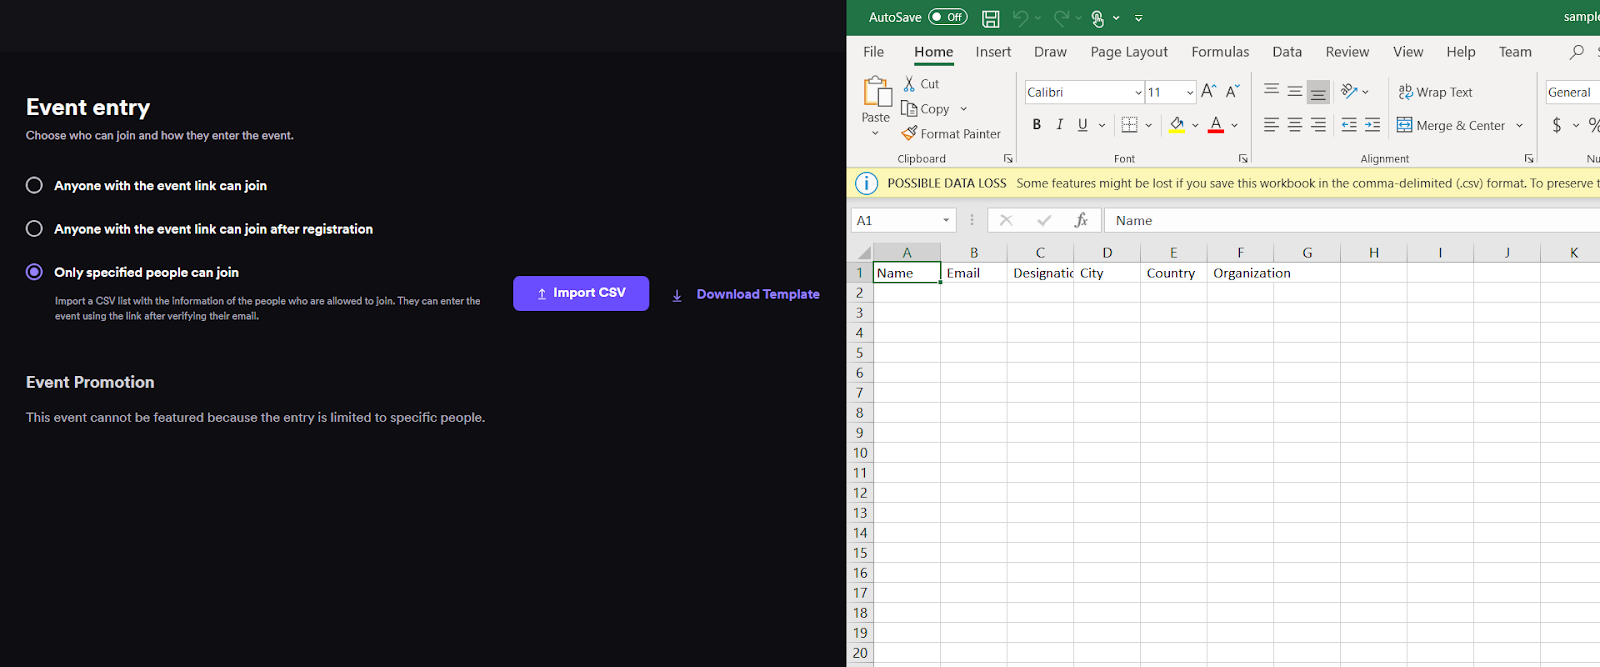
- C 👉 With this option, you can import a spreadsheet (.CSV file) of your PromoTix ticket buyers directly to Airmeet in order to grant access to your event. This is the most secured option.
TIP: If using the most secured option above, click on the "Download Template" button to download a template of the .CSV file required for Airmeet:
4. Create Tickets
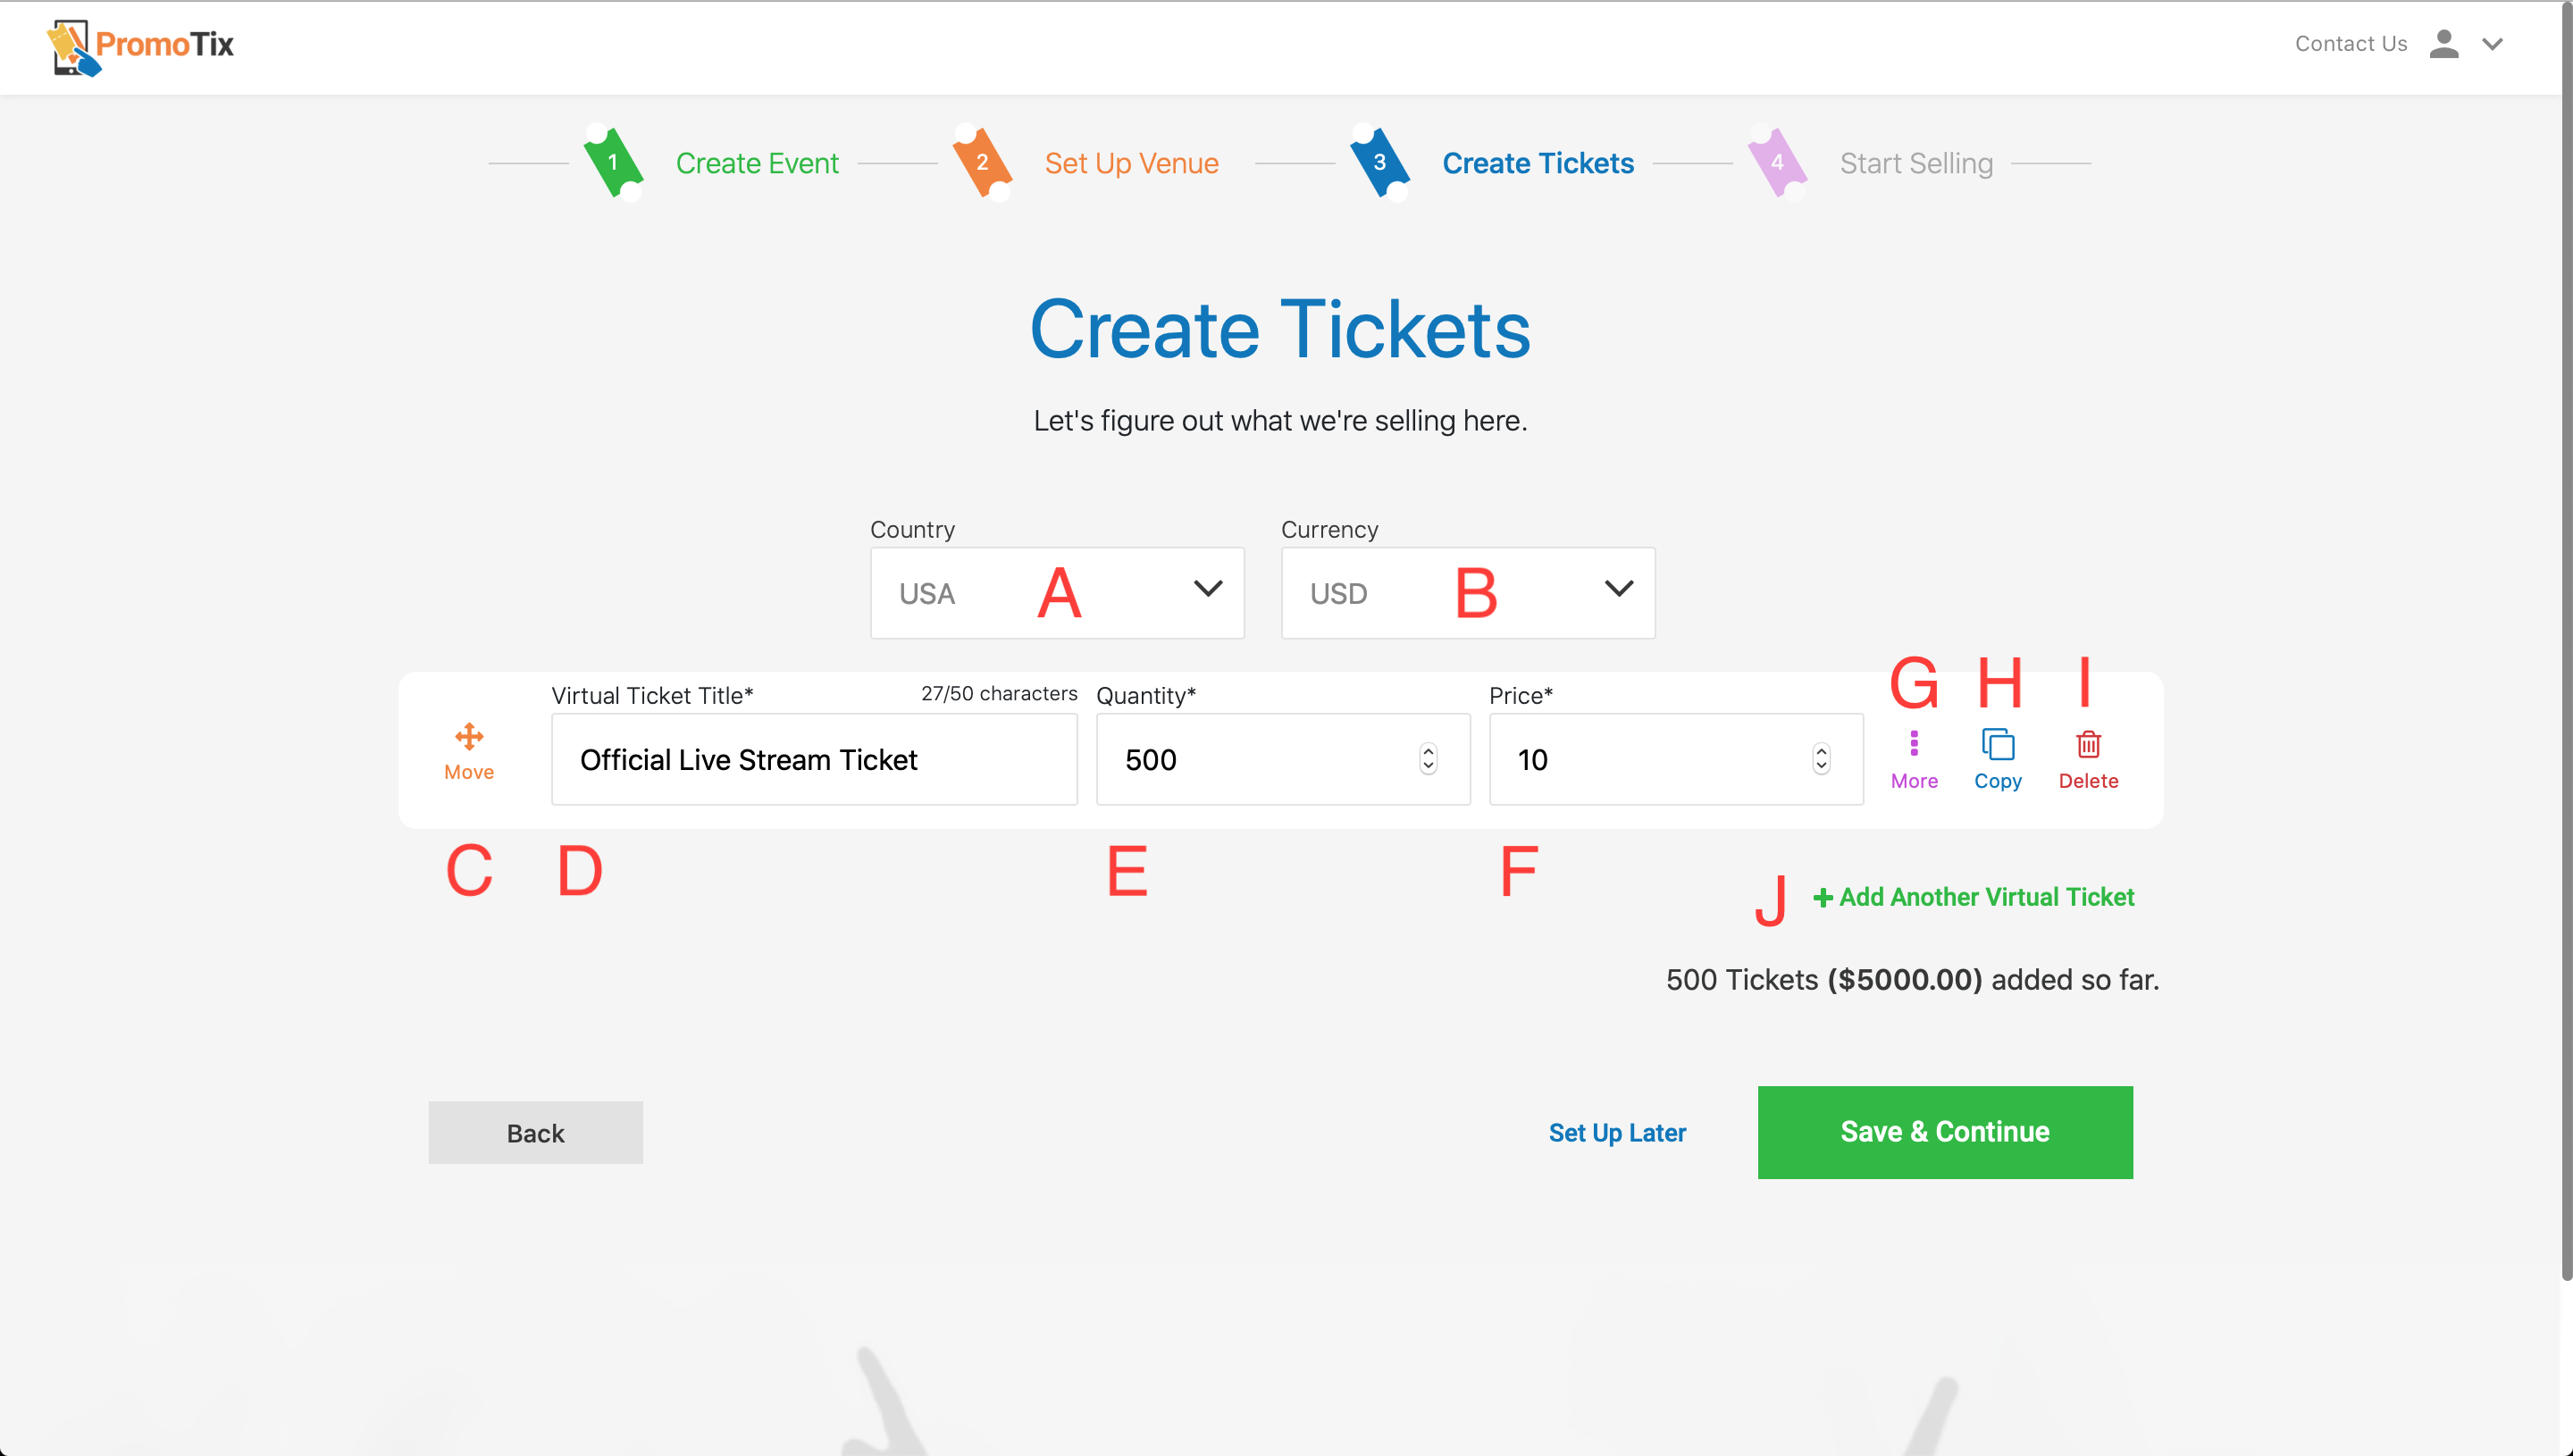 Time to let people know what you're selling! After you've set up all of your tickets, click on the "Save & Continue" button.
-
A 👉 Select your Country from the dropdown menu
-
B 👉 Select your Currency from the dropdown menu
-
C 👉 Click and drag to re-order your ticket types (optional)
-
D 👉Add a title for your ticket type
-
E 👉Set available ticket inventory
-
F 👉Set a price
-
G 👉 Show additional settings (see below)
-
H 👉Duplicate your ticket type
- I 👉Delete your ticket type
- J 👉Create a new ticket type
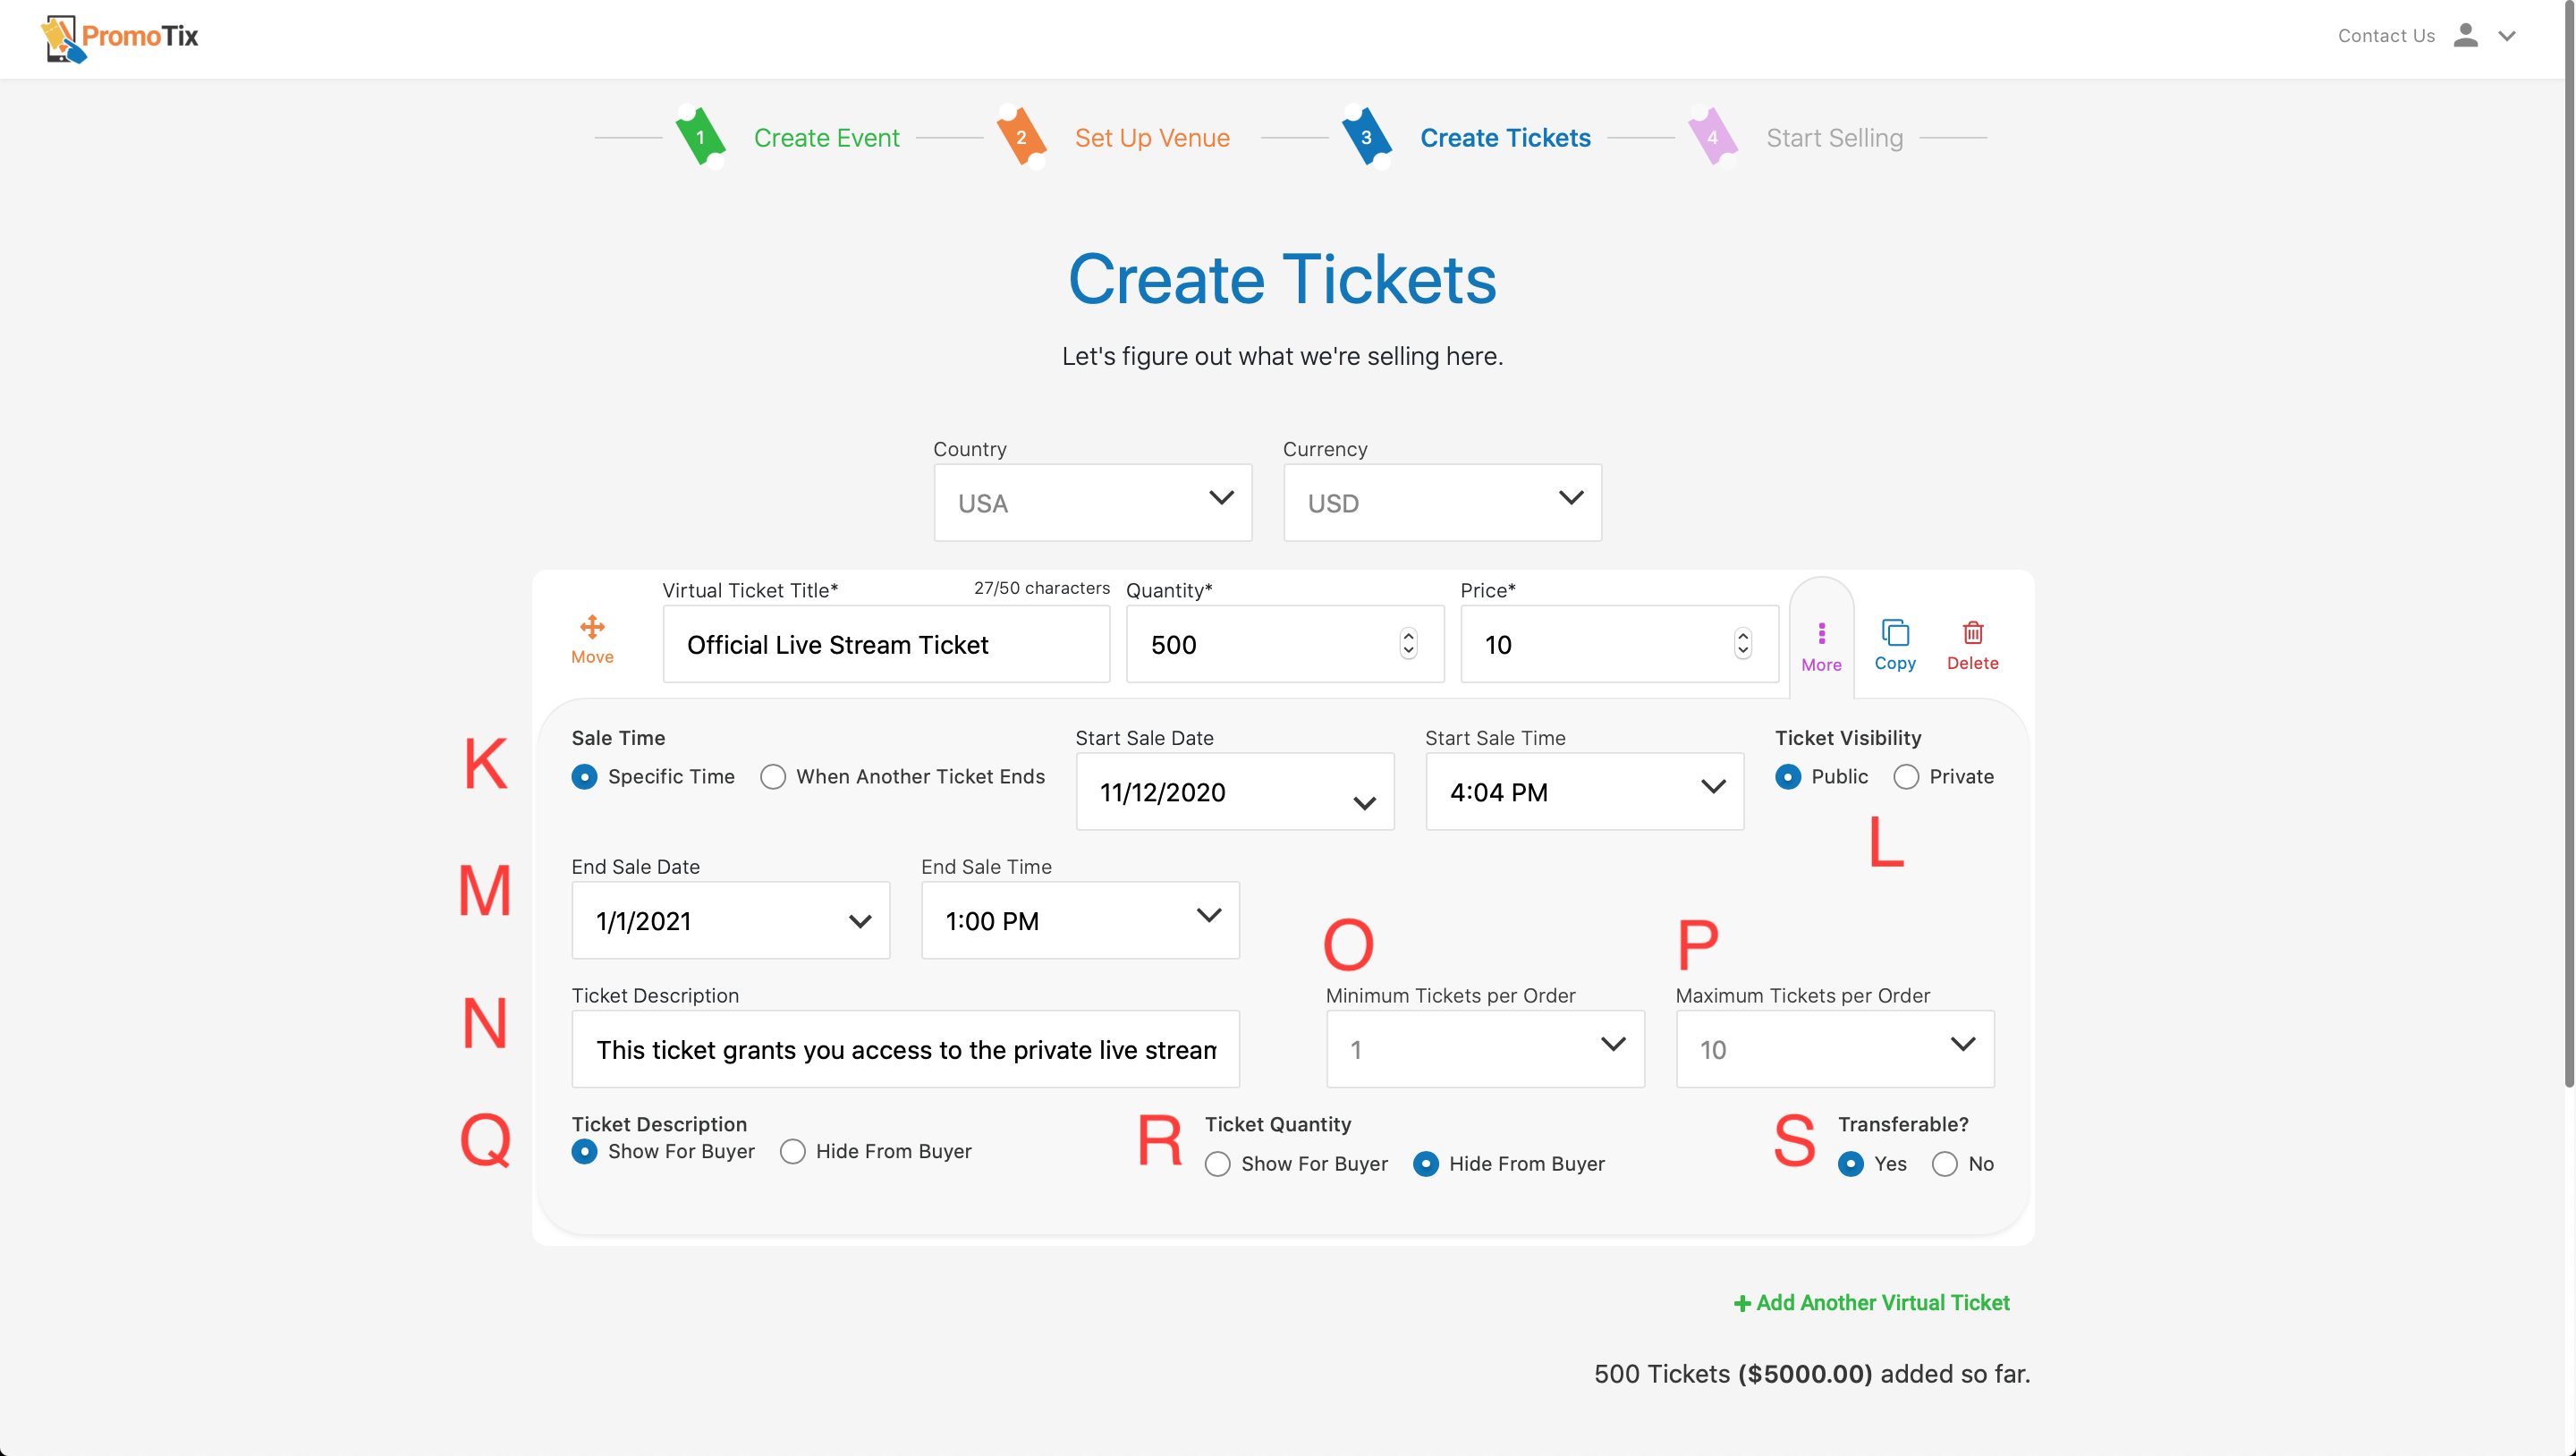
Here are the additional settings you can adjust for each ticket type:
-
K 👉 Decide when you would like your ticket type to go on sale
TIP: You can either choose a specific date & time, or have your ticket type go on sale when another one goes off sale.
-
L 👉 Set whether your ticket type will be public or private
-
M 👉 Decide when you would like your ticket type to go off sale
-
N 👉 Add a ticket description (optional)
-
O 👉 The minimum number of this ticket type that can be purchased at a time
-
P 👉The maximum number of this ticket type that can be purchased at a time
-
Q 👉 If "Hide From Buyer" is selected, your buyers will not see your ticket description
-
R 👉 If "Show For Buyer" is selected, your buyers will be able to see how many tickets are remaining
- S 👉If "No" is selected, ticket holders will not be allowed to transfer this ticket to others using PromoTix
5. Adjust Payment Settings

Make sure you get paid from ticket sales!
-
A 👉 If you need to collect additional tax on orders, you can add a tax here
-
B 👉 Select "Custom" here to add a refund policy (cannot be changed once your event is published)
-
C 👉 Your refund policy will be displayed publicly on your event page (cannot be changed once your event is published)
-
D 👉Add a support email address in case your buyers need to reach you
-
E 👉 If you're selling tickets on PromoTix, you'll be required to connect a Stripe account here. Simply click this button to link a pre-existing Stripe account, or create a new one.
NOTE: Once your Stripe account has been connected successfully, you will see a small edit icon on the button and the text "Connected with Stripe." You can click on the edit icon to connect a different Stripe account to your event once one has already been connected.
Once you're done on this screen, click on the "Save & Continue" button.
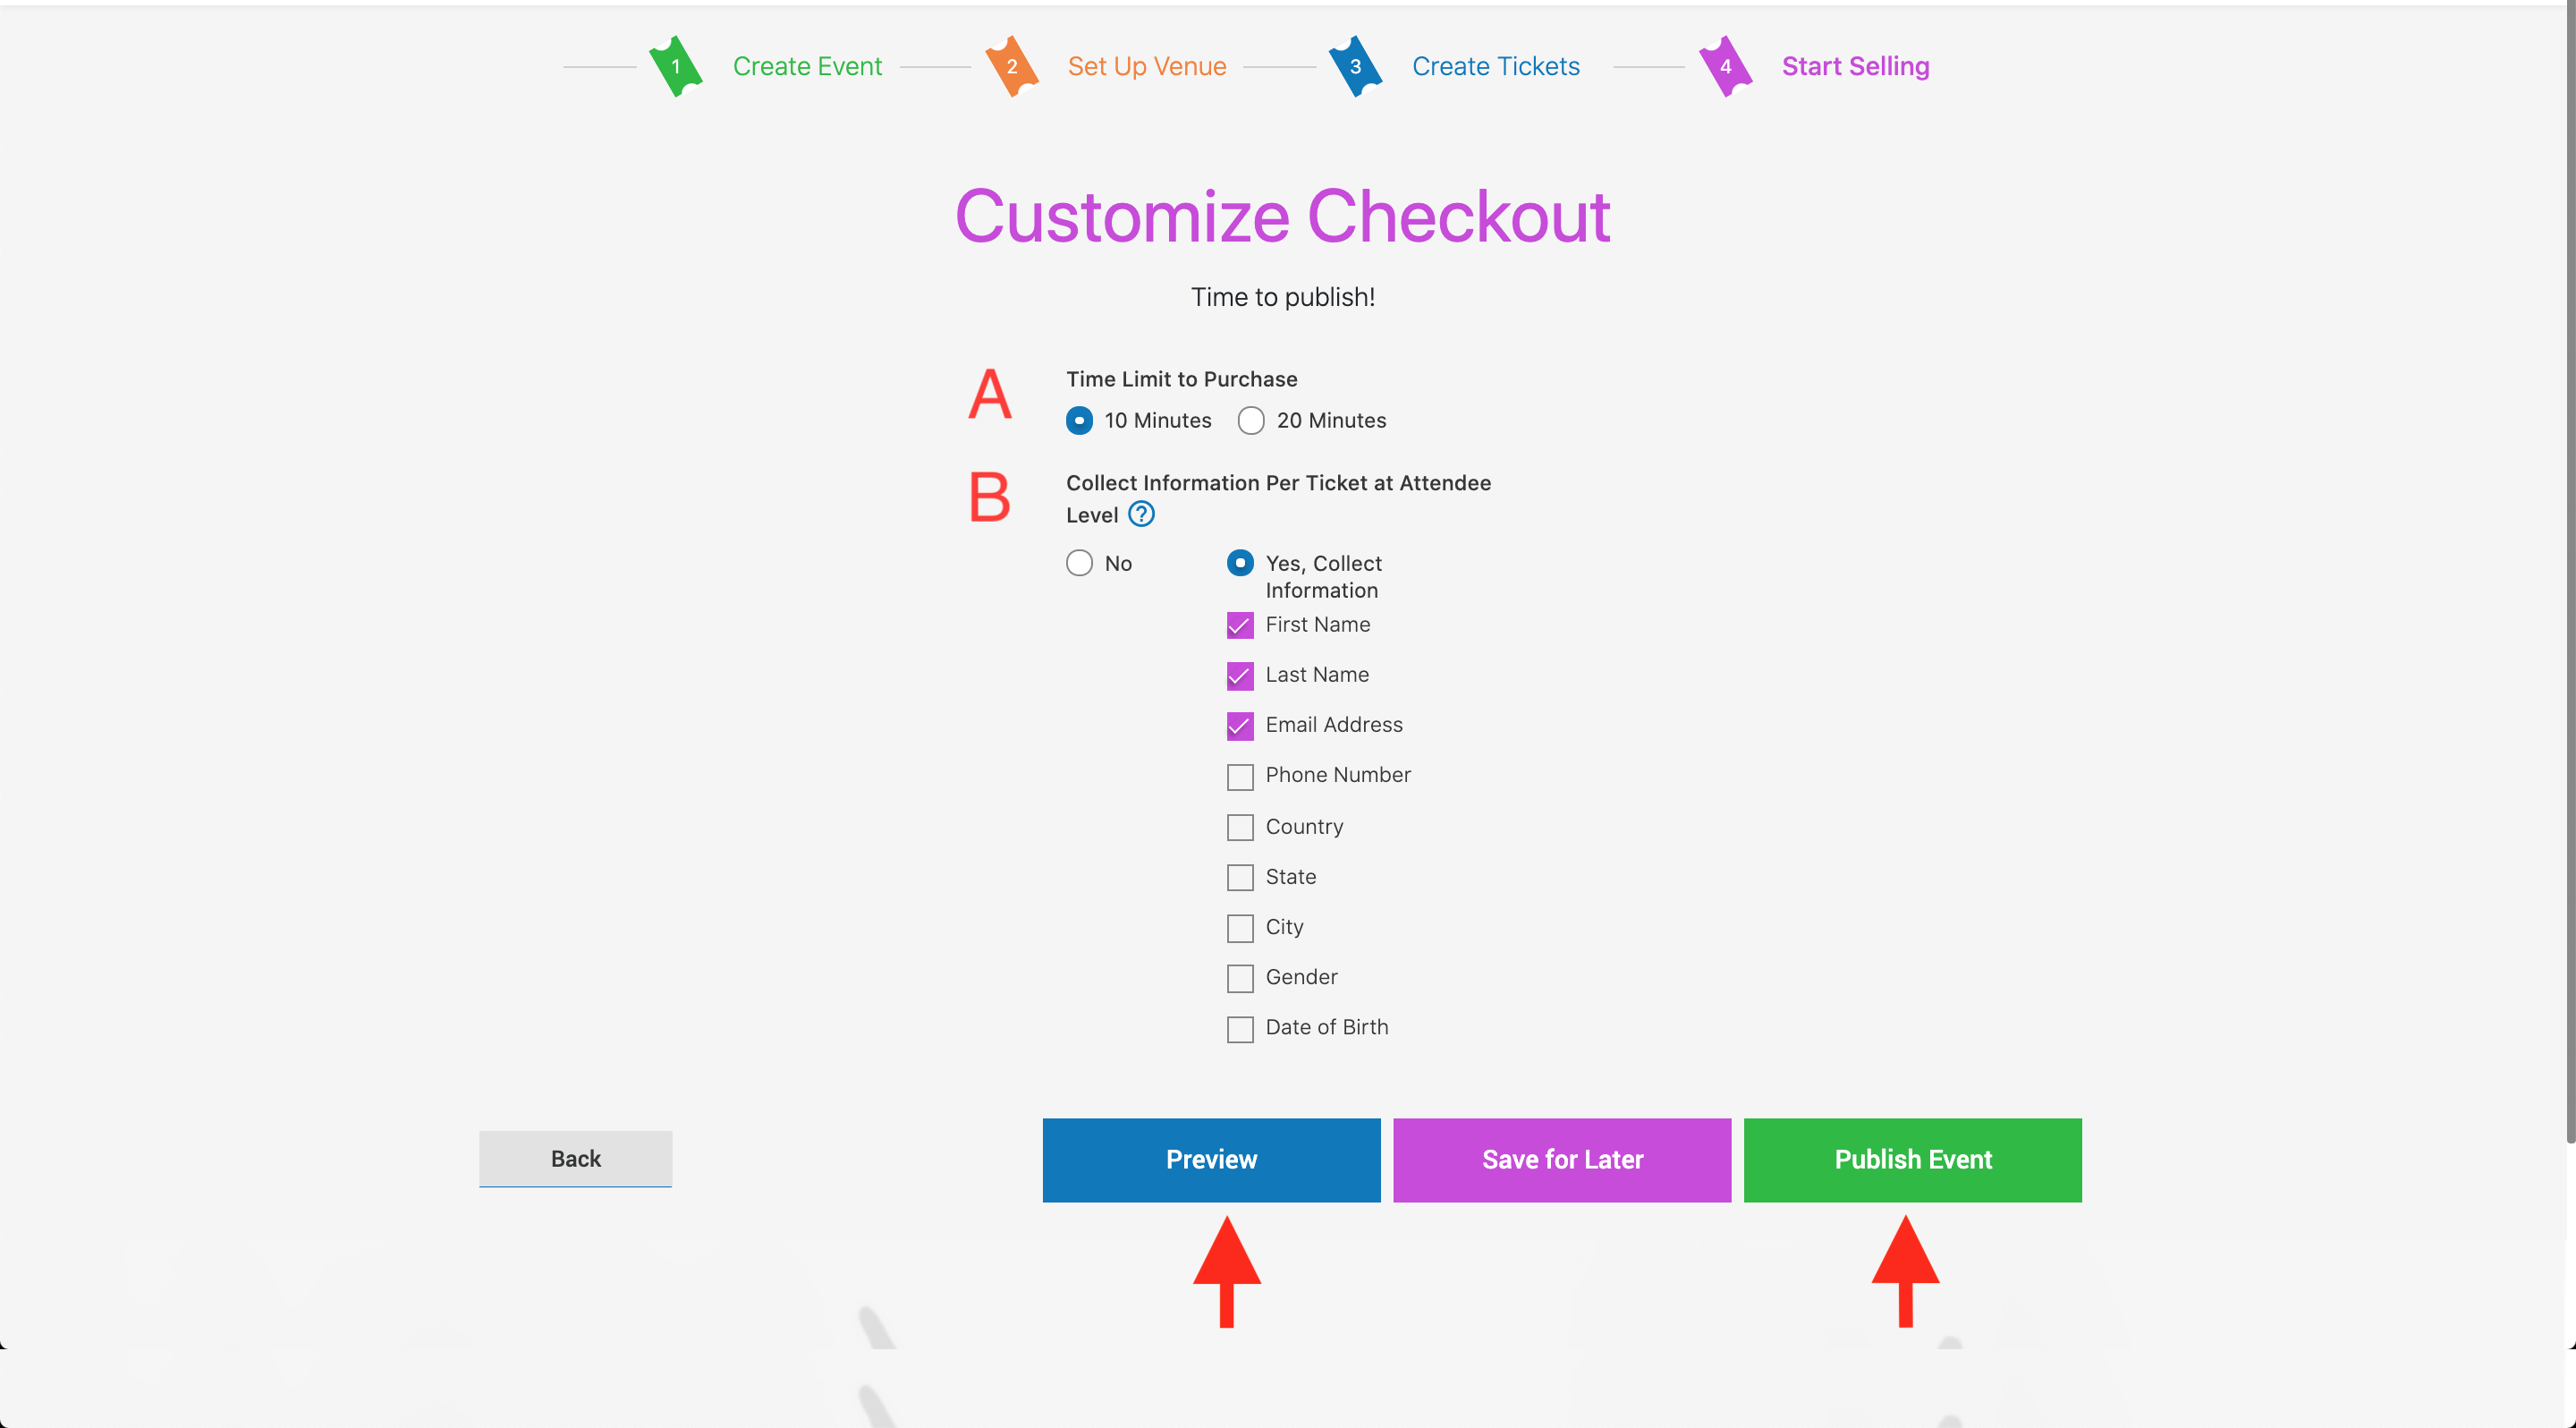
6. Customize Checkout
-
A 👉 Once customers add tickets to their cart, this is how much time they will have to checkout
-
B 👉By default, buyers do not have to fill out information for each ticket on their order. If you want to collect information on every ticket purchased, check the appropriate boxes.
NOTE: Anytime someone places an order, in case there's ever a problem we always collect the following information from them: First Name, Last Name, Email Address, and Phone Number.
Once you're done, if you'd like to see what your finished event page will look like, click on the "Preview" button. To publish your event page and start selling tickets, click on "Publish Event."
6. Start Selling Tickets
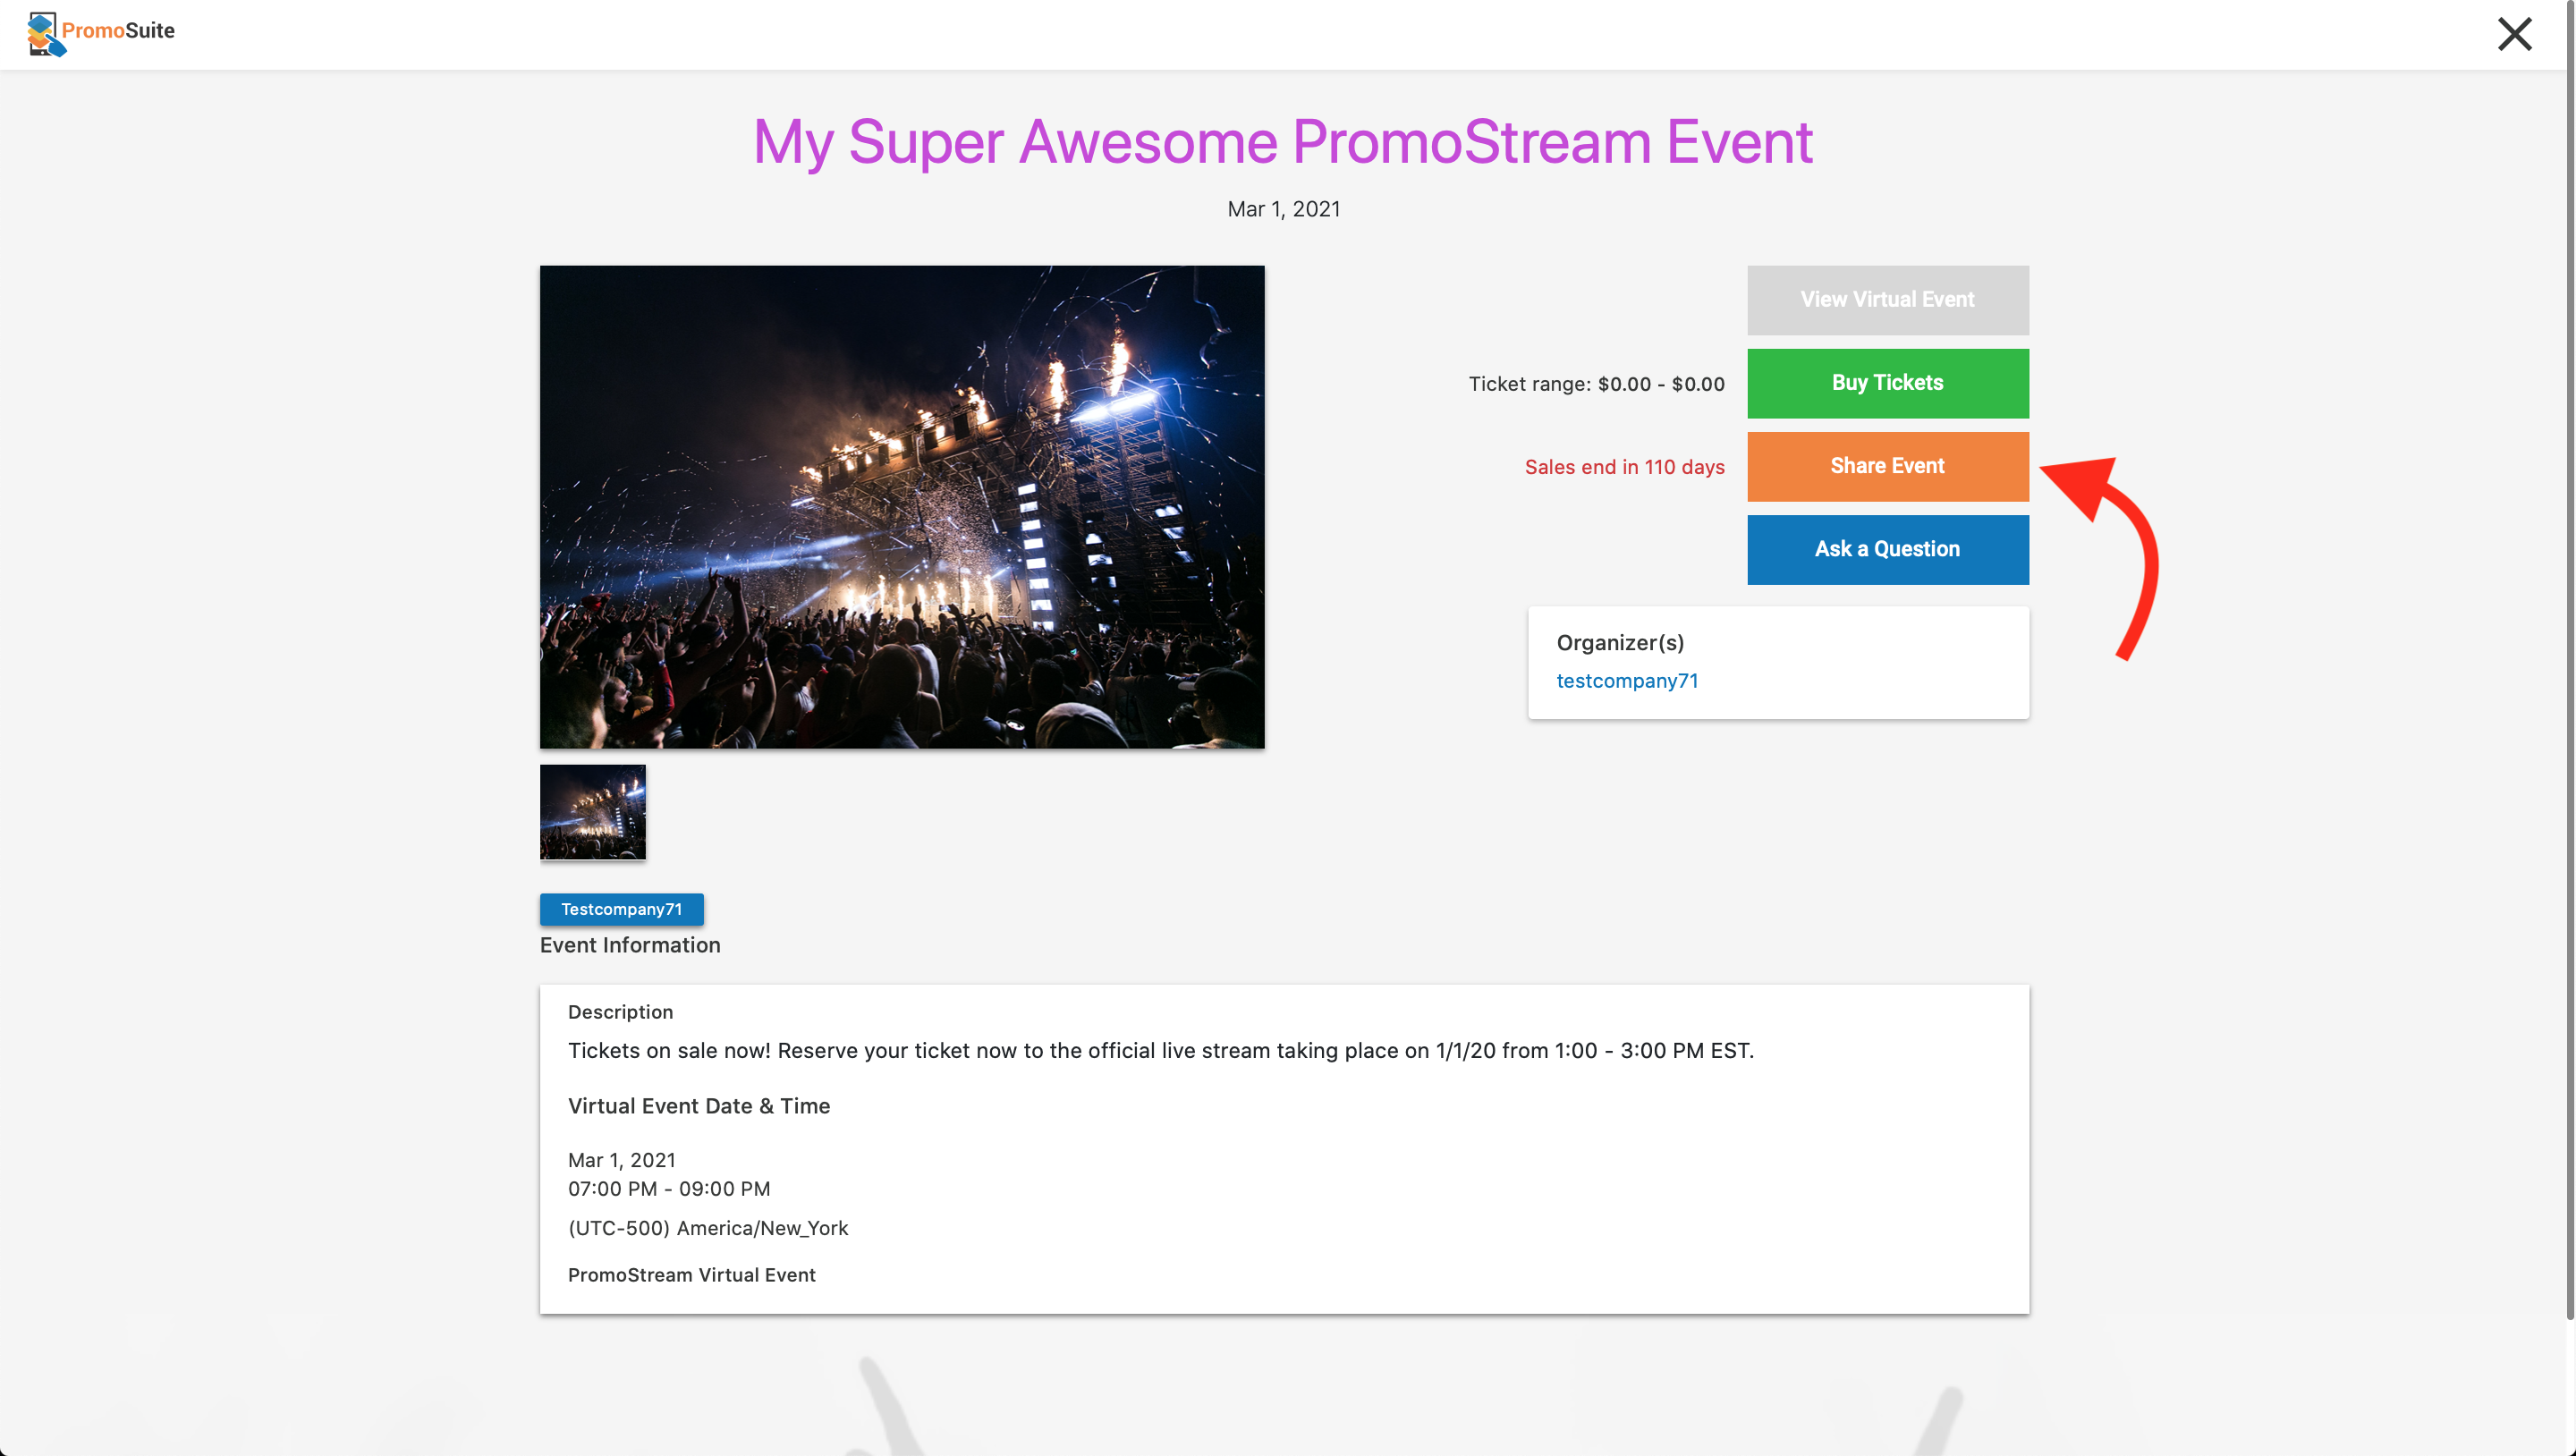 Congratulations, your event is now live!
Follow these steps to view your brand new event page, and share it with the world:
- Click on your event from your PromoTix dashboard (the small green banner that says "Live" indicates that your event has been published)
- Click on the "View Event" button in the top right hand corner of the screen
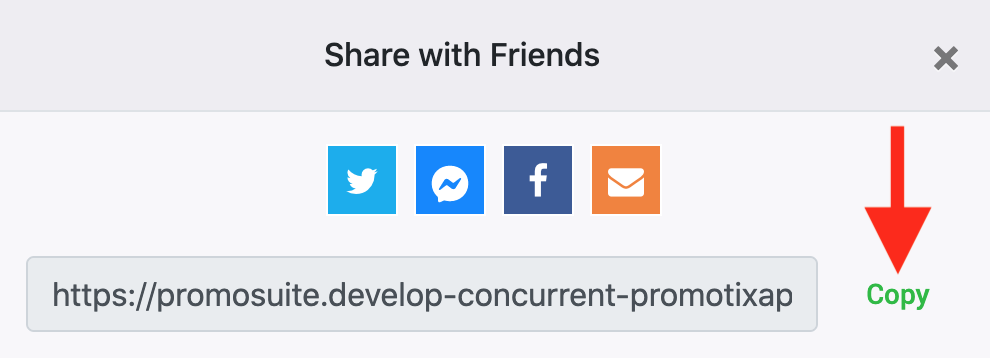
- Click on the orange "Share Event" button
- Copy your event page's link (shown below) and start sharing it to begin selling tickets
7. Import Your Ticket Buyers Into Airmeet (Recommended)
 If your Airmeet event is set to the most secured "Event entry" setting, you will need to import your ticket buyers from PromoTix into Airmeet.
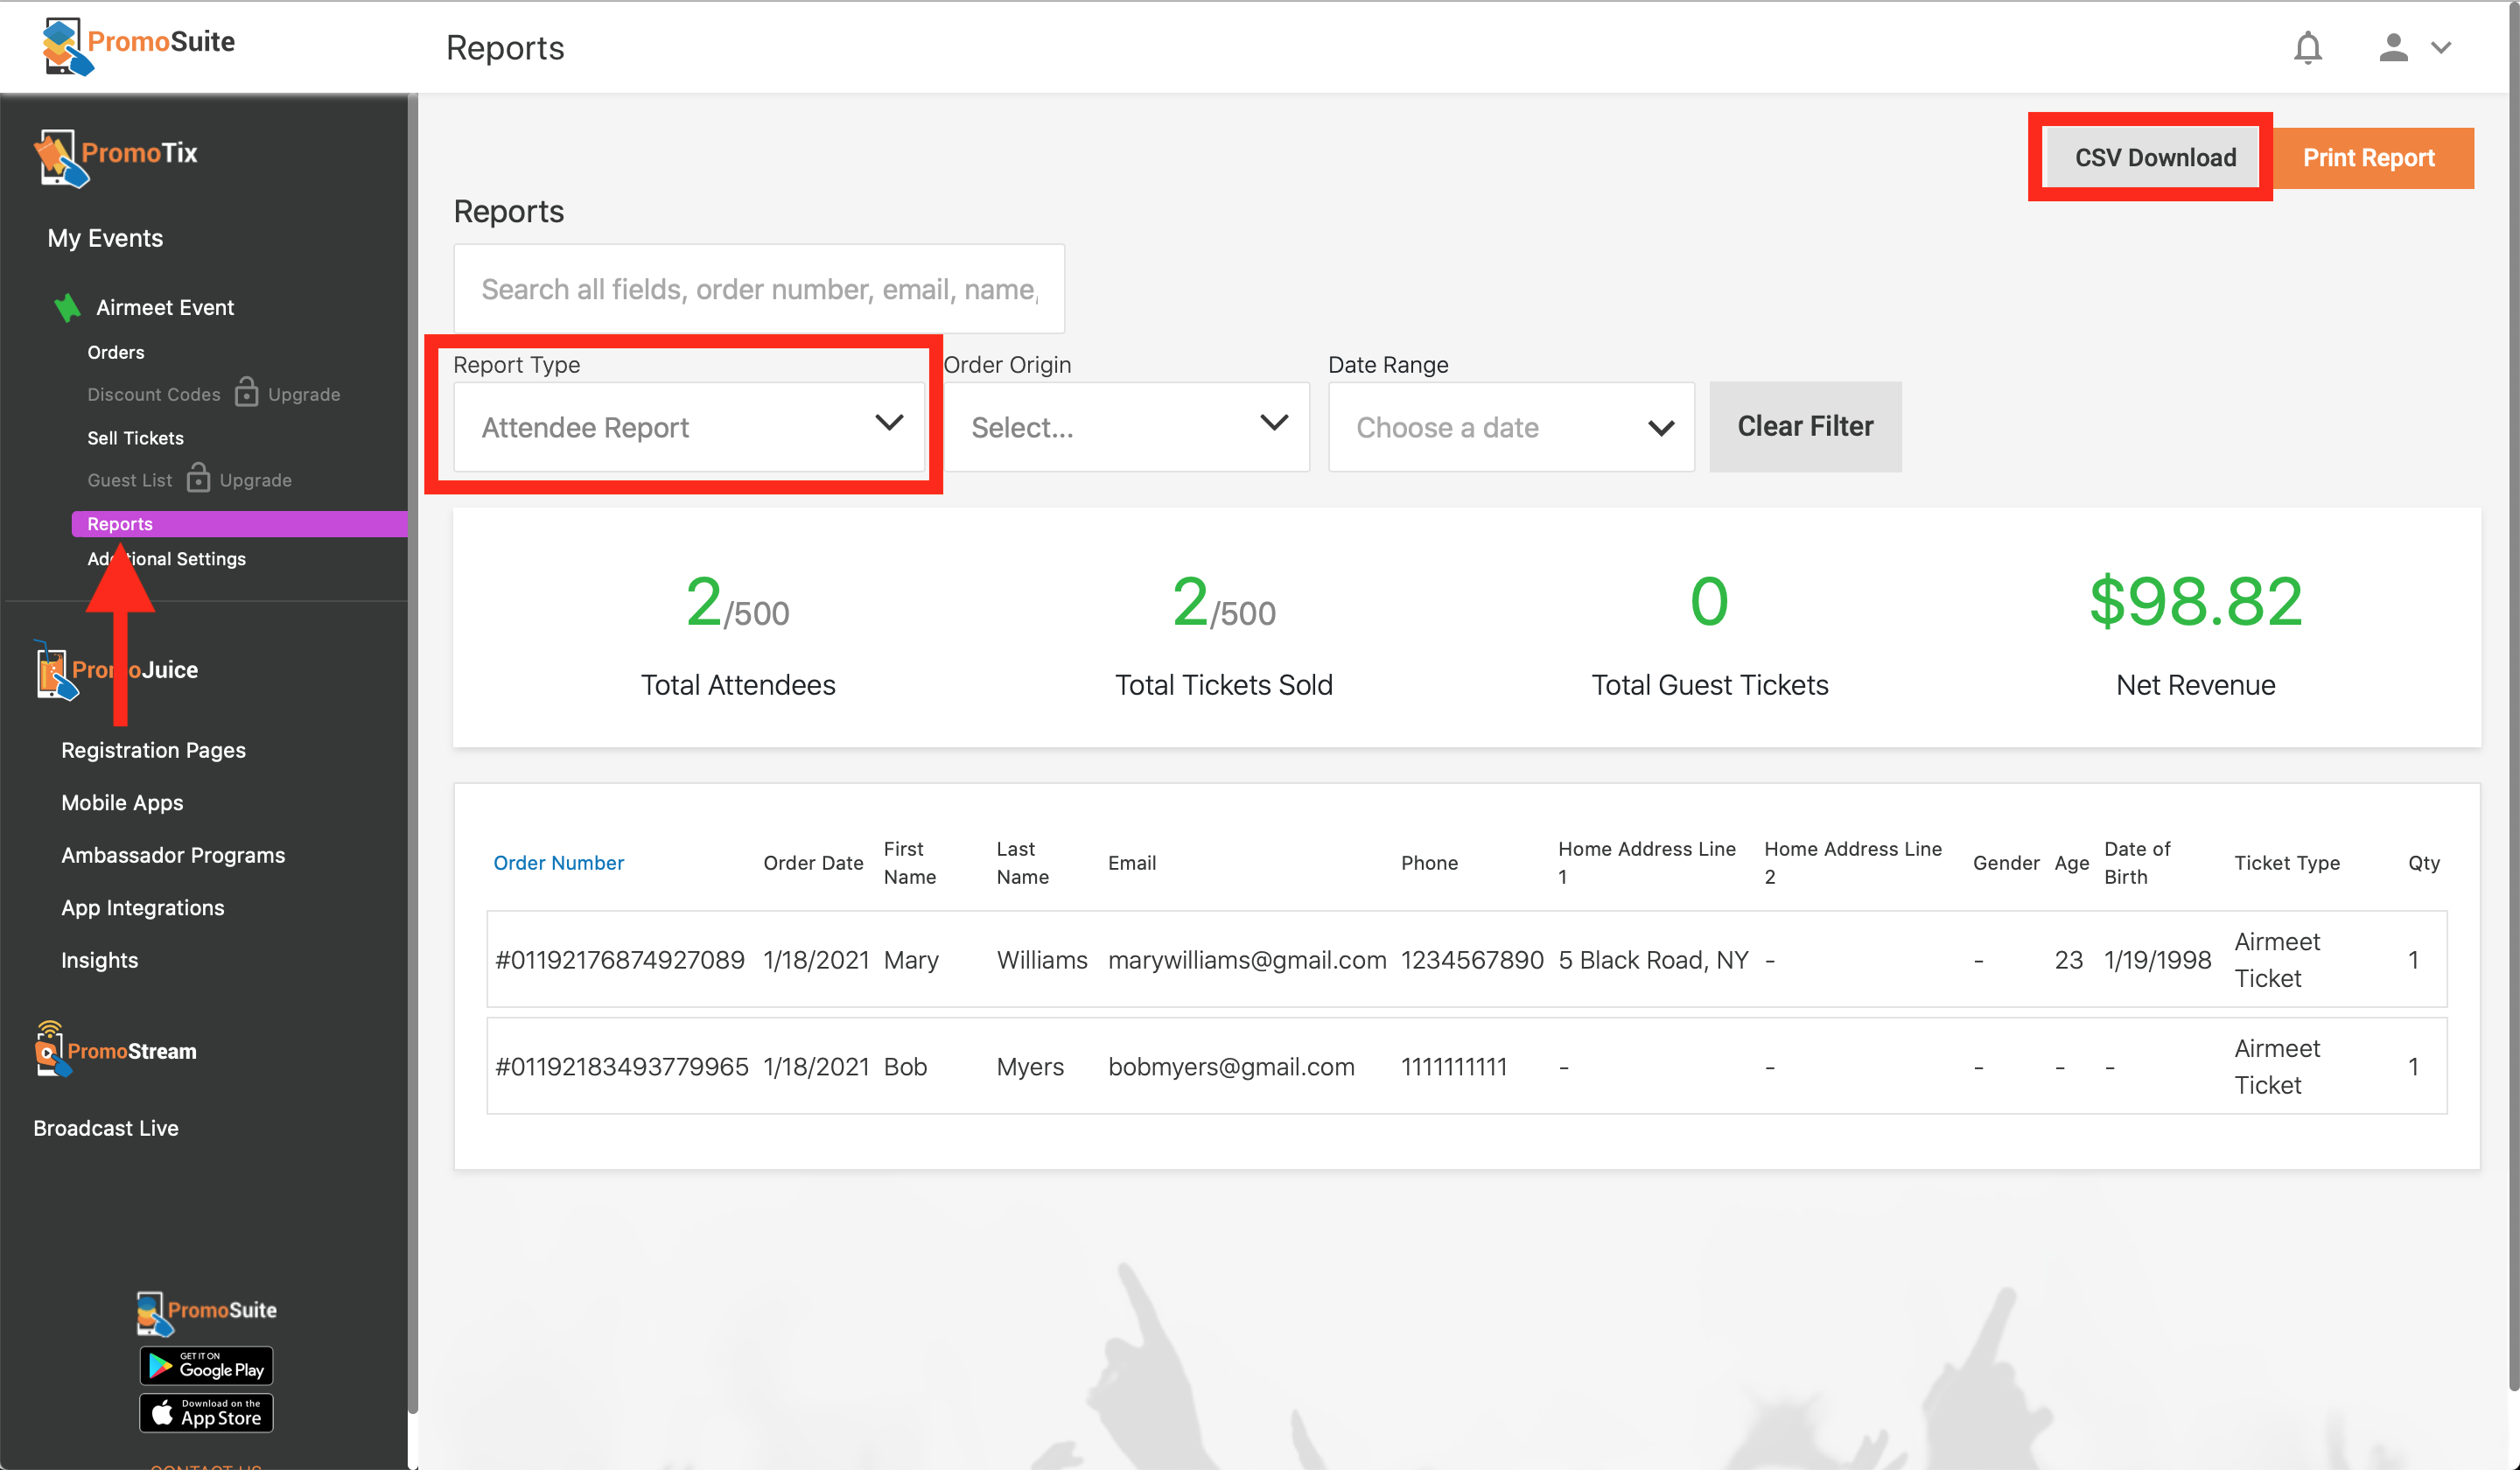
All PromoTix events have the ability to export reports. Once your ticket sales have ended, you can export all of your ticket buyers via a .CSV file from the Reports tab:
- Click on your PromoTix event from your "My Events" screen
- Click on the Reports tab in the left side navigation
- Select "Attendee Report" in the "Report Type" dropdown menu
- Click the "CSV Download" button in the top right hand corner of the screen
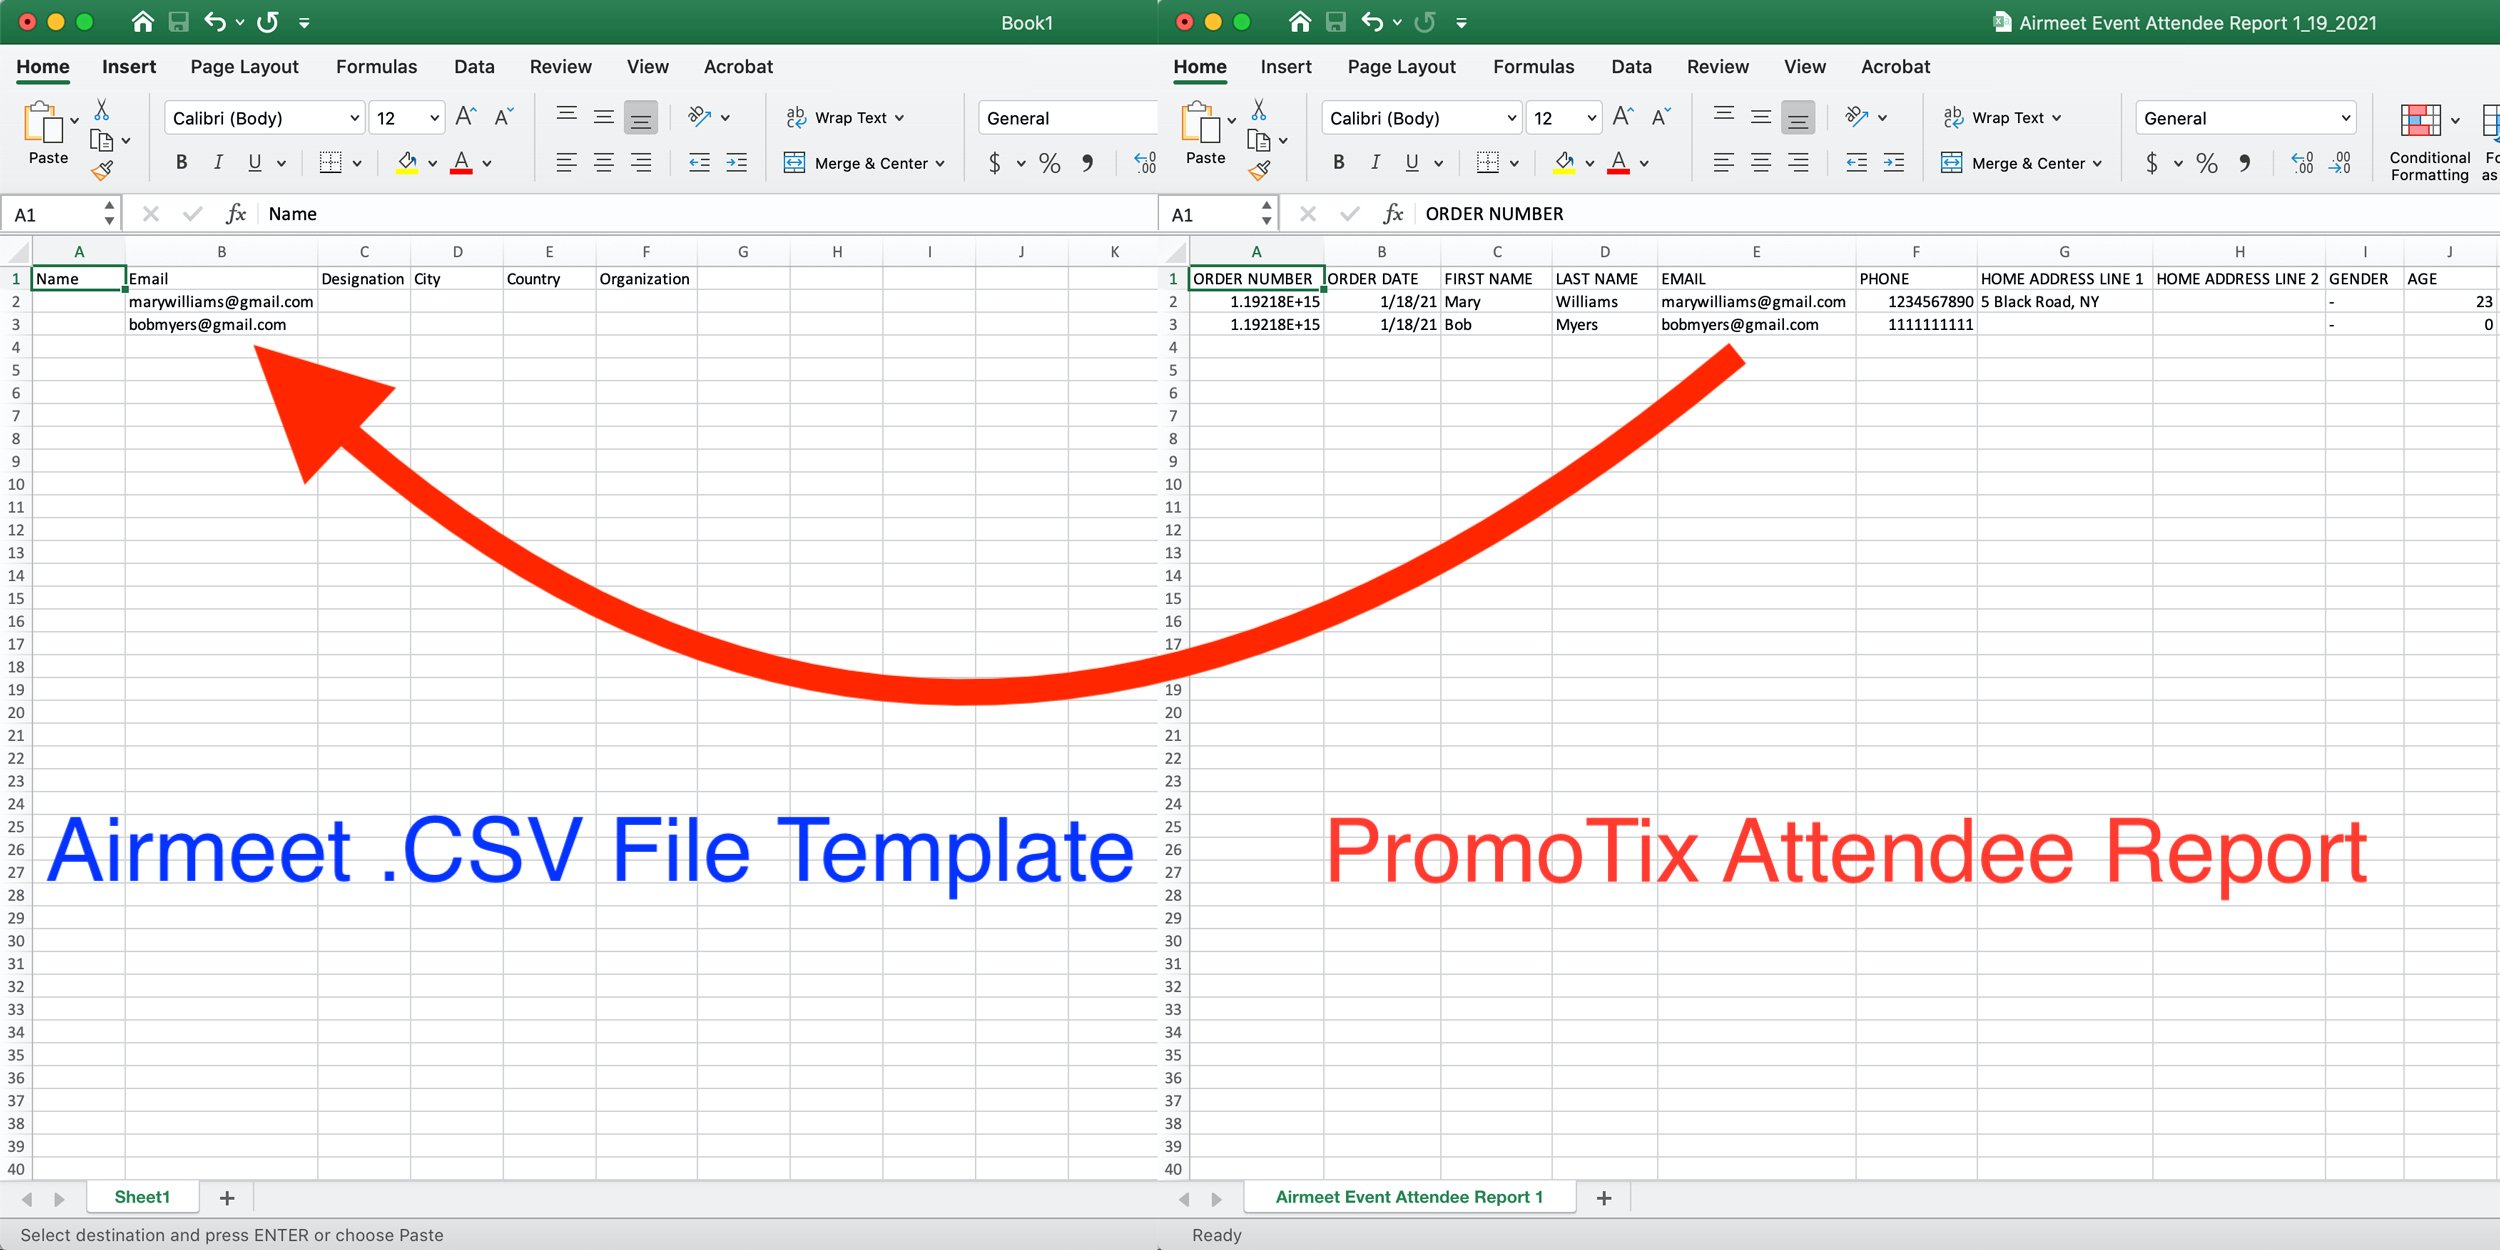
Afterwards, copy & paste your attendee email addresses into the Airmeet .CSV file template:
 Finally, import your newly created spreadsheet into Airmeet. This is essentially the “list at the door” of attendees that are allowed into your Airmeet. If an email address is not listed on the spreadsheet you imported, the attendee will not be able to join your event.
NOTE: Attendees of Airmeet events are required to register for an Airmeet account if they don't already have one. Attendees who buy tickets to your event on PromoTix should use the same email address when registering for an Airmeet account.

