

(Last Updated 2/16/26)
Need a credit card terminal at your event so you can swipe, insert, and tap cards? If you are using Stripe to process payments on PromoTix, follow these instructions to use the Stripe Reader M2 credit card terminal with your event.
In addition to the convenience of using this credit card terminal, Stripe offers discounted payment processing rates on all sales made using it. Please see here for the details.
The Stripe Reader M2 credit card terminal is supported by both the iOS and Android versions of the PromoTix Organizer mobile app.
IMPORTANT: USD is the only currency currently supported by the Stripe Reader M2.
1. Purchase a Stripe Reader M2 from Stripe
If you don't already own a Stripe Reader M2, visit this URL to purchase one off of Stripe's website.
IMPORTANT: do not source a Stripe Reader M2 from anywhere other than Stripe's website. Doing so may result in the Stripe Reader M2 not being compatible with the PromoTix Organizer mobile app.
2. Turn the Stripe Reader M2 on
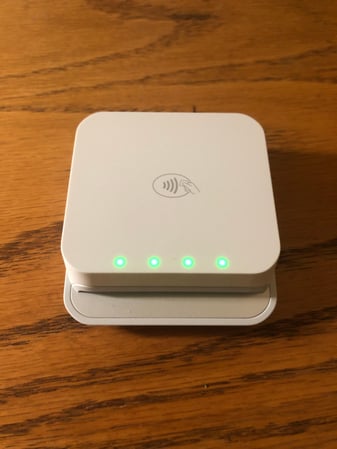 Once you've acquired a Stripe Reader M2, charge it and then turn it on using the button on the side of the device.
3. Power on your device and enable Bluetooth

Once your device is turned on, navigate to your Bluetooth settings. Ensure that Bluetooth is turned on, and then exit.
IMPORTANT: Do not attempt to pair your device to the Stripe Reader M2 from within your device's Bluetooth settings. The bluetooth connection has to be initiated from within the PromoTix Organizer mobile app. Keep reading for further instructions.
4. Download the PromoTix Organizer mobile app and login
 To download the PromoTix Organizer mobile app, please click the links below:
Once the app is downloaded, open it and login to your PromoTix event organizer account.
5. Once logged in, tap on the "Box office" option located in the bottom right
 Tap on the "Box office" option.
6. Select the event you would like to sell tickets for
 If you have multiple live events, tap on the specific event that you would like to sell tickets for. To access your recurring events, tap on the "Recurring event(s)" tab located at the top of the screen.
7. Tap on the "Sell tickets" tab, and then continue through the checkout process
 The "Sell tickets" tab should be selected by default. Add item(s) to the shopping cart, and then follow the steps through the checkout process.
IMPORTANT: if your customer would like to be sent a copy of their receipt via email, simply collect their email address on the following screen.
8. On the "Payment" step, tap on the "Read card" icon to begin the pairing process

Once you are ready to pair your Stripe Reader M2, tap on the "Read card" icon with the Stripe Reader M2 turned on and in close range.
You should see a pairing request with your Stripe Reader M2's serial number shown. Verify to make sure that the serial number matches the Stripe Reader M2 that you wish to connect to (if you have multiple):

Tap on the "Pair" button. You should see four lights on the reader start flashing.
NOTE: if this is the first time that you are using your Stripe Reader M2 (or if you have not used it in awhile), a mandatory firmware update may be required. This update will be triggered when you first pair your Stripe Reader M2 using the PromoTix Organizer mobile app. If a message displays that says an update is being installed, allow the update to install and do not take any other actions until a message appears which says that the update has finished installing. Once the update has finished installing, close the PromoTix Organizer mobile app and re-open it.
TROUBLESHOOTING:
- If you do not see the "Read card" icon, check to make sure that your event's currency is set to USD. USD is currently the only currency supported by the Stripe Reader M2.
- If you do not see a pairing request, your Stripe Reader M2 may have fallen asleep. Push the button on the side of the Stripe Reader M2 to wake it up.
9. Once the reader has been paired, tap on "Okay"
 A message will appear confirming that the reader has been paired successfully to your device. Tap on the "Okay" button to proceed.
10. Tap, insert, or swipe a card
 The above message will appear confirming that the Stripe Reader M2 is ready to accept a card. Tap on the "Okay" button, and then tap, insert, or a swipe a card using the Stripe Reader M2.
NOTE: "two quiet beeps" means there was an issue reading the card. Listen for a "loud beep" which means the card was read successfully.
NOTE: the "swipe" option is located on the bottom of the Stripe Reader M2. Other "tap-to-pay" options such as Apple Pay and Google Pay can also be accepted using the Stripe Reader M2.
11. Confirm or cancel the payment
 Once the card has been read successfully, a message will appear asking you to either cancel or process the payment:
-
Tap on the "Yes" button if you wish to process the payment.
- Tap on the "Cancel" button if you no longer wish to process the payment, or if you simply wanted to pair your device to your Stripe Reader M2 to prepare it for future orders.
12. Decide if all items on the order should be checked in or not
 Once the payment has been processed successfully, a message will appear asking you to decide if all of the items on the order should be checked in or not:
- If the customer is redeeming all of the items on their order right now 👉 Tap on "Yes" to automatically mark all of the items on the order as "checked in"
- If the customer will be redeeming some or all of the items on their order at a later point 👉 Tap on "No" to leave all of the items on the order "checked out"
13. Tap on "Back to sell tickets" to begin a new order

Tap on the "Back to sell tickets" button to begin a new order.
NOTE: on subsequent orders, you won't need to pair your Stripe Reader M2 to your device again (saving time on subsequent orders). However if any of the following occurs, your Stripe Reader M2 will need to be paired again:
- Your Stripe Reader M2 is turned off (either manually or after 10 hours of inactivity)
- Your device is turned off
- You close the PromoTix Organizer mobile app
- You exit the box office in the PromoTix Organizer mobile app
IMPORTANT: if you are using multiple devices and Stripe Reader M2's all turned on and in close range, one common issue is for one of your devices to "accidentally pair" with a different Stripe Reader M2 (not the one you intended to pair it with). Please follow the steps below to prevent this issue:
- Before selling any tickets for the day, navigate to each of your device's Bluetooth settings and "forget" all previous Stripe Reader M2 Bluetooth connections.
- Working one device at a time, follow the instructions above to pair each of your devices to a specific Stripe Reader M2 (creating "pairs").
- Keep each "pair" separate to prevent accidental swapping.
- If you have extra Stripe Reader M2's that are not being used, hold the button on the side of each one to power them all off. If you would like to keep your extra Stripe Reader M2's powered on so that they can charge, keep them in a separate location from the Stripe Reader M2's that you are actively using. This will prevent your devices from accidentally attempting to pair with your extra Stripe Reader M2's that are not in use.
- While selling tickets, make a habit of pushing the button on the side of your Stripe Reader M2 to "wake it up" in case it has fallen asleep. This will prevent your device from accidentally attempting to pair with a different Stripe Reader M2.
- While selling tickets, if you receive a new "pairing request" for a different Stripe Reader M2, do not accept it. Instead, push the button on the side of your Stripe Reader M2 to ensure it is turned on, and tap on the "Read card" icon to attempt to connect to your Stripe Reader M2 again.

