If you want to host a more professional-looking, high-quality stream then learning how to use OBS is a must. OBS stands for Open Broadcast Software. It’s a free tool for live streaming and video recording. It can be used with PromoTix to create more engaging ticketed virtual events.
Once you have the fundamentals down then you can start mixing video, screen sharing, hosting guests, and more during your live stream.
OBS broadcast tutorial video for PromoTix
How does OBS work?
Begin by downloading OBS onto your computer. Once downloaded it’s recommended that you click "Settings" in the lower right hand corner of the screen:
- (Under "Output") Video Bitrate: 2,000 Kbps
- (Under "Video") Frames Per Second (FPS): 30
 Once you've downloaded OBS, it may seem overwhelming and confusing at first but it’s actually pretty simple to use. The main place you will want to focus on is the bottom left corner, the scenes and sources columns.
Scenes are like presets and sources are the inputs that the scene shows. There are nearly infinite possibilities when it comes to creating scenes. You can design multiple scenes and then transition between them during your live stream.
Earn revenue with PromoTix and OBS
PromoTix is the world's first live streaming software to offer an easy way for event organizers, instructors, and creators to create ticketed, private live stream events in just minutes.

Set scenes
Before deciding what scenes to create it’s helpful to create some sort of storyboard or timeline for your live stream. You can set up a different scene for each part of the stream. Transitions allow for movement from scene to scene. It can be a simple cut, jump, fade or those more tech-savvy can set up more advanced transitions.
In addition to your main scene, basic scenes to consider including are:
- Stream Starting Soon/Preview Scene- This can be a simple graphic or include a countdown clock at the beginning of your stream.
- Be Right Back Scene- In the case of technical difficulties, this simple graphic can add a professional touch.
- Ending Scene- You can display credits in a video or include a graphic detailing your next stream time at the end of your virtual event.
Main scene
As mentioned before, there are a nearly infinite amount of scenes that you can create using OBS. Right now, we will cover the 5 basic scenes which are:
- Webcam only
- Webcam with image overlay
- Screen share only
- Screen share with webcam
- Host a guest
For each scene, it’s important to give it a name so that you can keep track of which scene is which. You can even create separate profiles for each type of stream you will be hosting. This way you have templates ready to go and do not need to spend time before each individual stream setting it up.
Webcam only
This may seem really simple but it’s important to set up both the video and audio so that the quality is better. If you do not select an audio source then it will pull from the default settings.
- Under scenes click the “+” button under the scenes column on the far left.
- Name your scene.
- Add a source to your scene by clicking the “+” button under the source column.
- Choose “Video Capture Device”.
- Name your source.
- Choose your video device from the drop-down menu.
- Choose “Audio Input Capture”.
- Name your source.
- Choose your audio device from the drop-down menu.
Pro tip: Wear headphones! This will help with feedback and prevent your microphone from picking up other audio. Even if you do not have a fancy microphone, getting wired headphones with a microphone will make a huge difference vs just using your computer mic.
If you want to use multiple camera angles then you will need more than one camera. Set up as many sources for as many cameras that you have. Then you can apply transitions in between so you can switch. Once you are an advanced user you can even set up hotkeys to allow for seamless switching.
Webcam with image overlay
Follow the same steps as above but add one additional source. Once you add the image in you will be able to place it wherever you see is the best fit. When adding a simple banner it should be fairly easy to place in the scene.
If you are looking to get more creative and design more of a frame for your stream, then you will need to create an image that has a spot for the video. PIXLR or Canva are two free online tools that can help you create beautiful overlays, banners, and frames.
Screen share only
Whether you are looking to share a slideshow presentation, a web page, or walk through a tutorial, screen sharing is a dynamic way to create a more engaging stream. There are a few different ways that you can go about sharing your screen in OBS.
- Under scenes click the “+” button under the scenes column on the far left.
- Name your scene.
- Add a source to your scene by clicking the “+” button under the source column.
- Choose source:
- Browser Source- You will then be prompted for a URL, width, height, and it will display the URL directly.
- Display Capture- Name your display capture and then press “OK”. Now it will show the selected monitor. You can choose different monitors by selecting a different display.
- Window Capture- Name your display capture and then press “OK”. You will be prompted to choose which window you would like to display. This will display only the one window you want to show rather than your entire screen.
Pro Tip: If you find your display is cut off then right-click, select transform, and then choose fit to screen.
If you find that you are not seeing any options to display then you may need to adjust some settings. When using a Mac computer you will need to set the permissions. You can do this by selecting “Show windows with empty names”. Choose an option with (null). Then you will be prompted to allow for screen recording in your system preferences.
Screen share with webcam
Follow the same steps above to share your screen but also add in a video source to the same scene. Once you add the video source in you will see that you can move it around. Place the video where you find it doesn’t block the screen you are sharing.
If you want to really step things up you can even create an overlay for the scene so that it looks more polished. Be sure that where you want to put the video or screen share that the image is transparent. This can be added by adding an image to the sources for this scene.
Host a guest
This will require the use of an outside video chat platform like Skype or Zoom to feed in the video of your guest. From there you can either choose window capture or if you have more than one monitor you can put the video chat on that monitor and crop that display. This will prevent a “flicker” effect from happening to the video chat.
If you want both of you on the screen at the same time then you will need to set up a scene that has your webcam video input, your audio input, and a window capture with the video chat application selected. In addition, if you want it to look cleaner then you may want to add an image overlay. Complete the steps listed above and place your video and your guest’s videos where looks best.
When using a Mac computer then you will also need to install a plugin in order to get the audio of your guest. A helpful option is “iShowU Audio Capture”. Once you install it you will also need to change the settings on your computer to combine multiple audio interfaces. Be sure once you have finished this that you click the speaker volume button on your computer and select the multi-output device or whatever you named this new setting.
Going live on PromoTix using OBS
So you've published your PromoTix event, you've set up OBS exactly how you want it, and now you're ready to go live! Be sure to watch the video at the top of this page, or just simply follow these steps:
- Login to your PromoTix account
- Click on your "Broadcast Live" tab from the left navigation menu
- Click on your live stream event
- Click on the "Use OBS" button
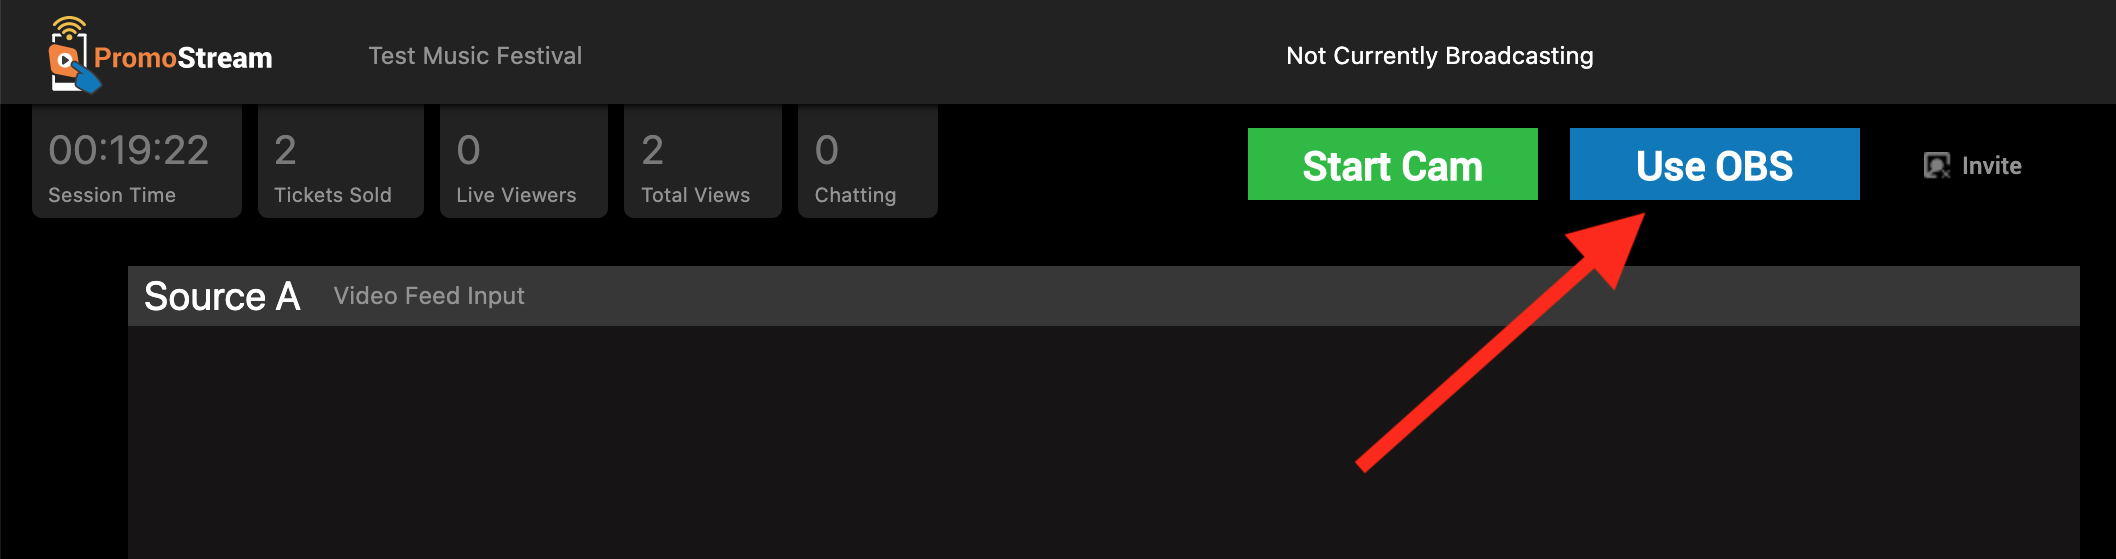
- Note down the Server and Stream Key text that appears on screen
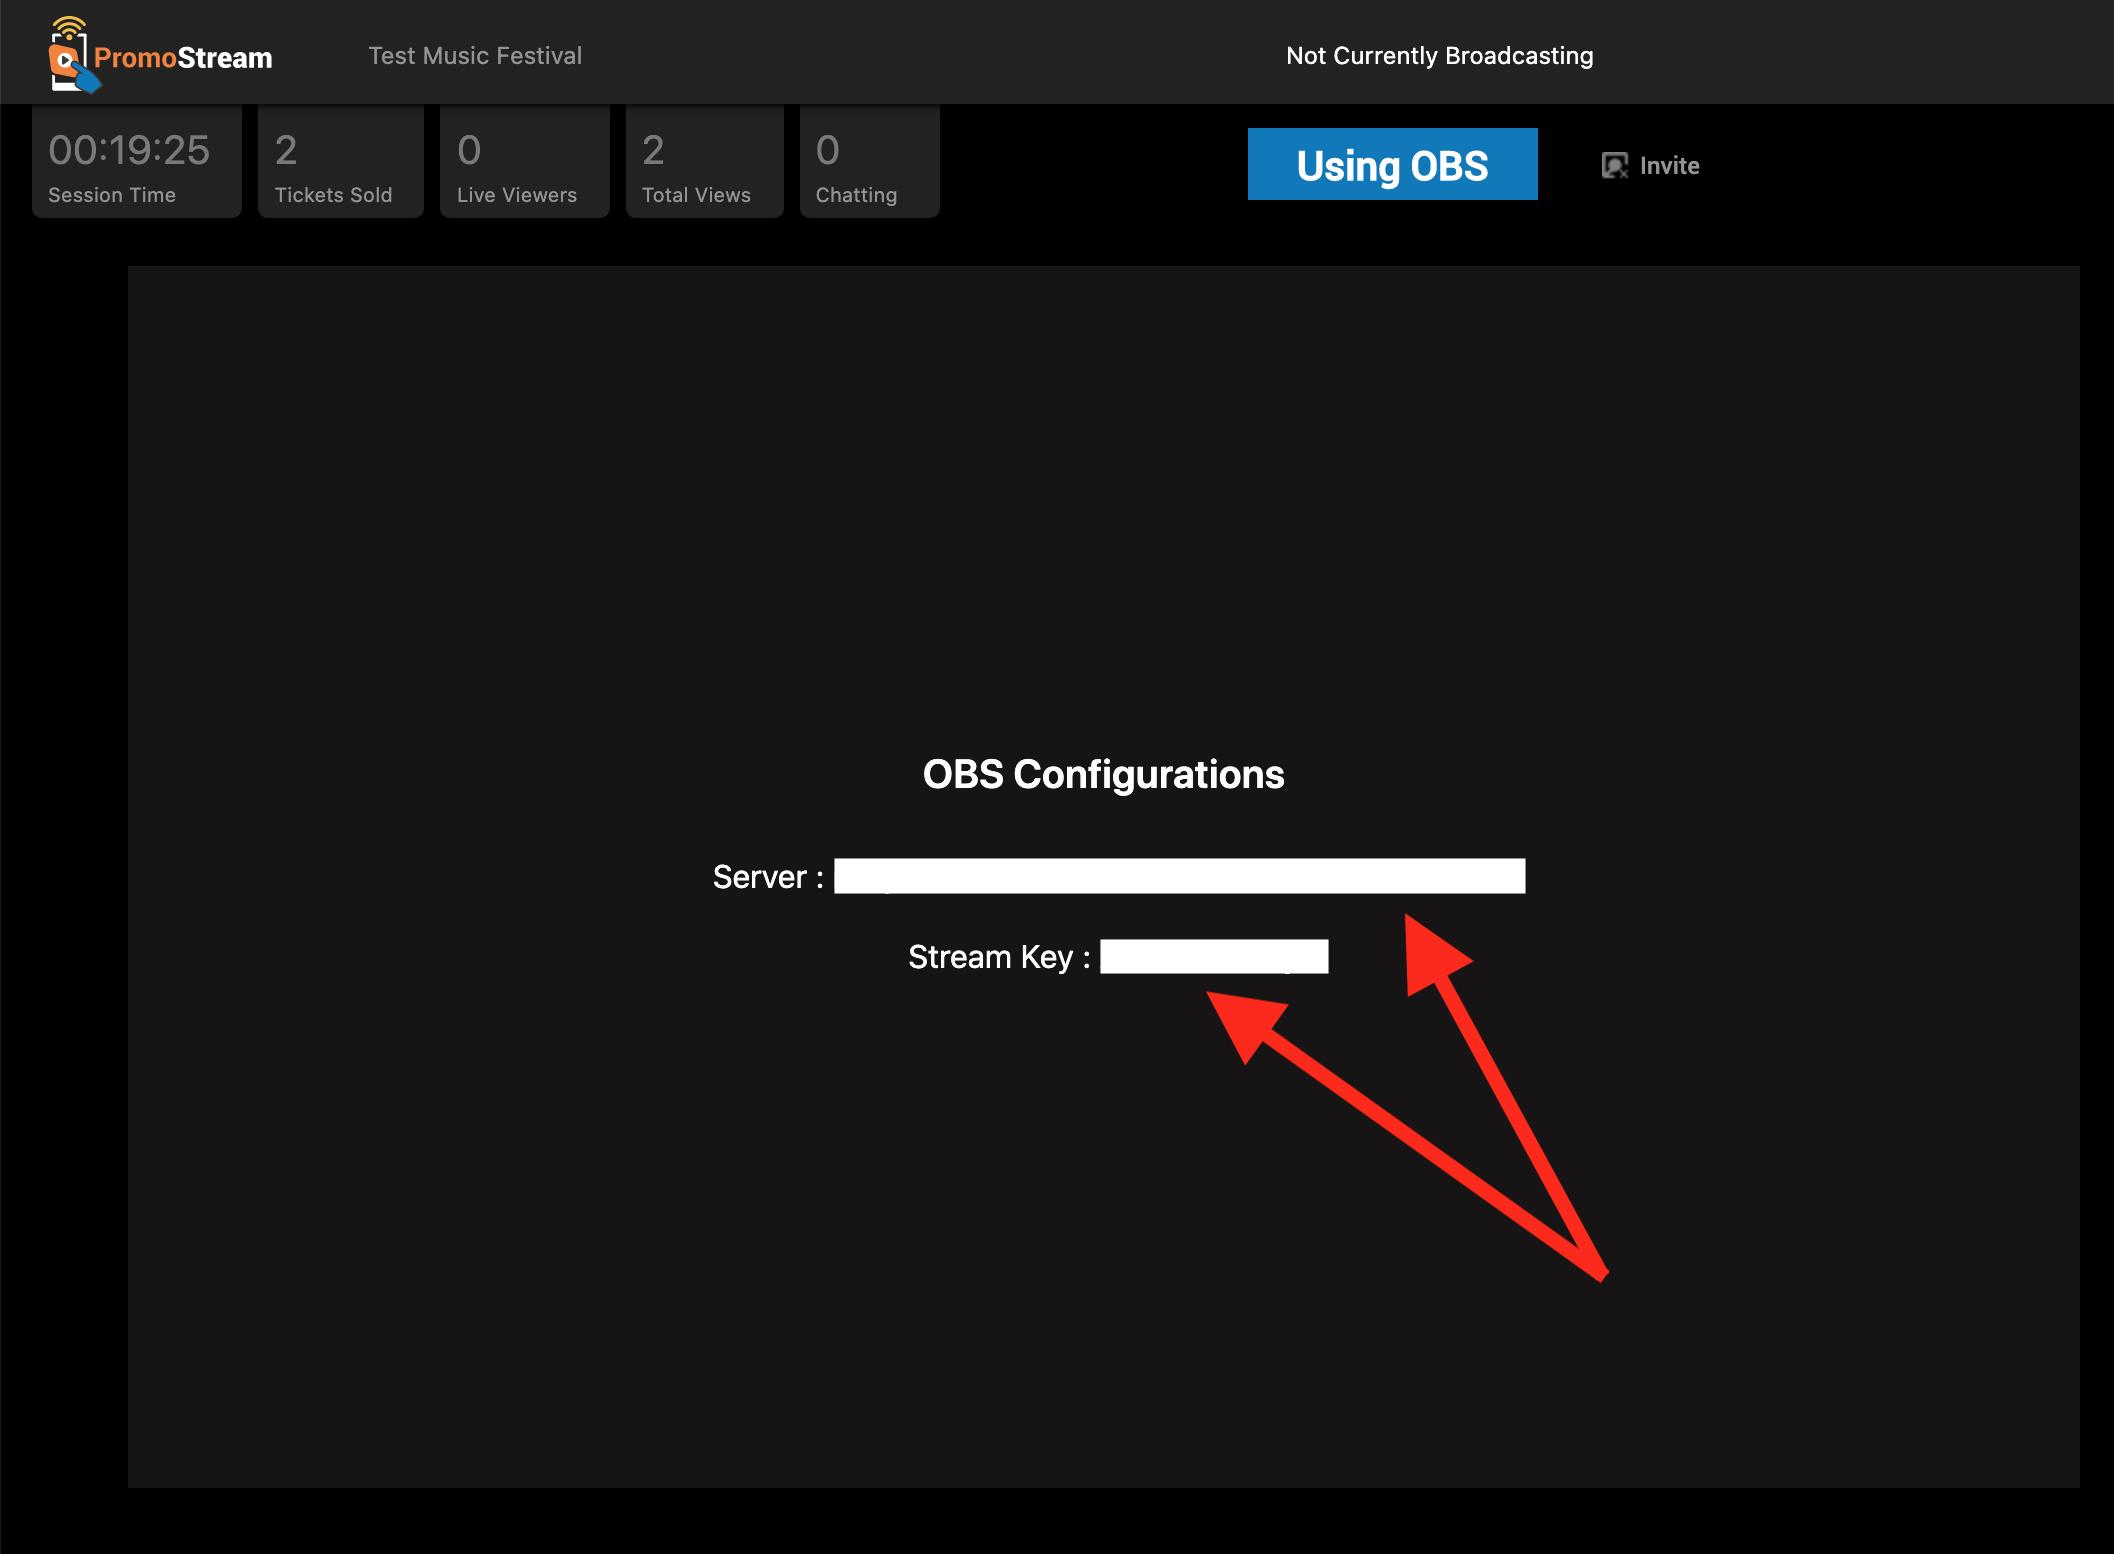
- In OBS, go to your Preferences, and then click on "Stream"
- Click the "Service" dropdown menu and select "Custom..."
- Copy and paste your Server and Stream Key into the two fields
- Click "OK"
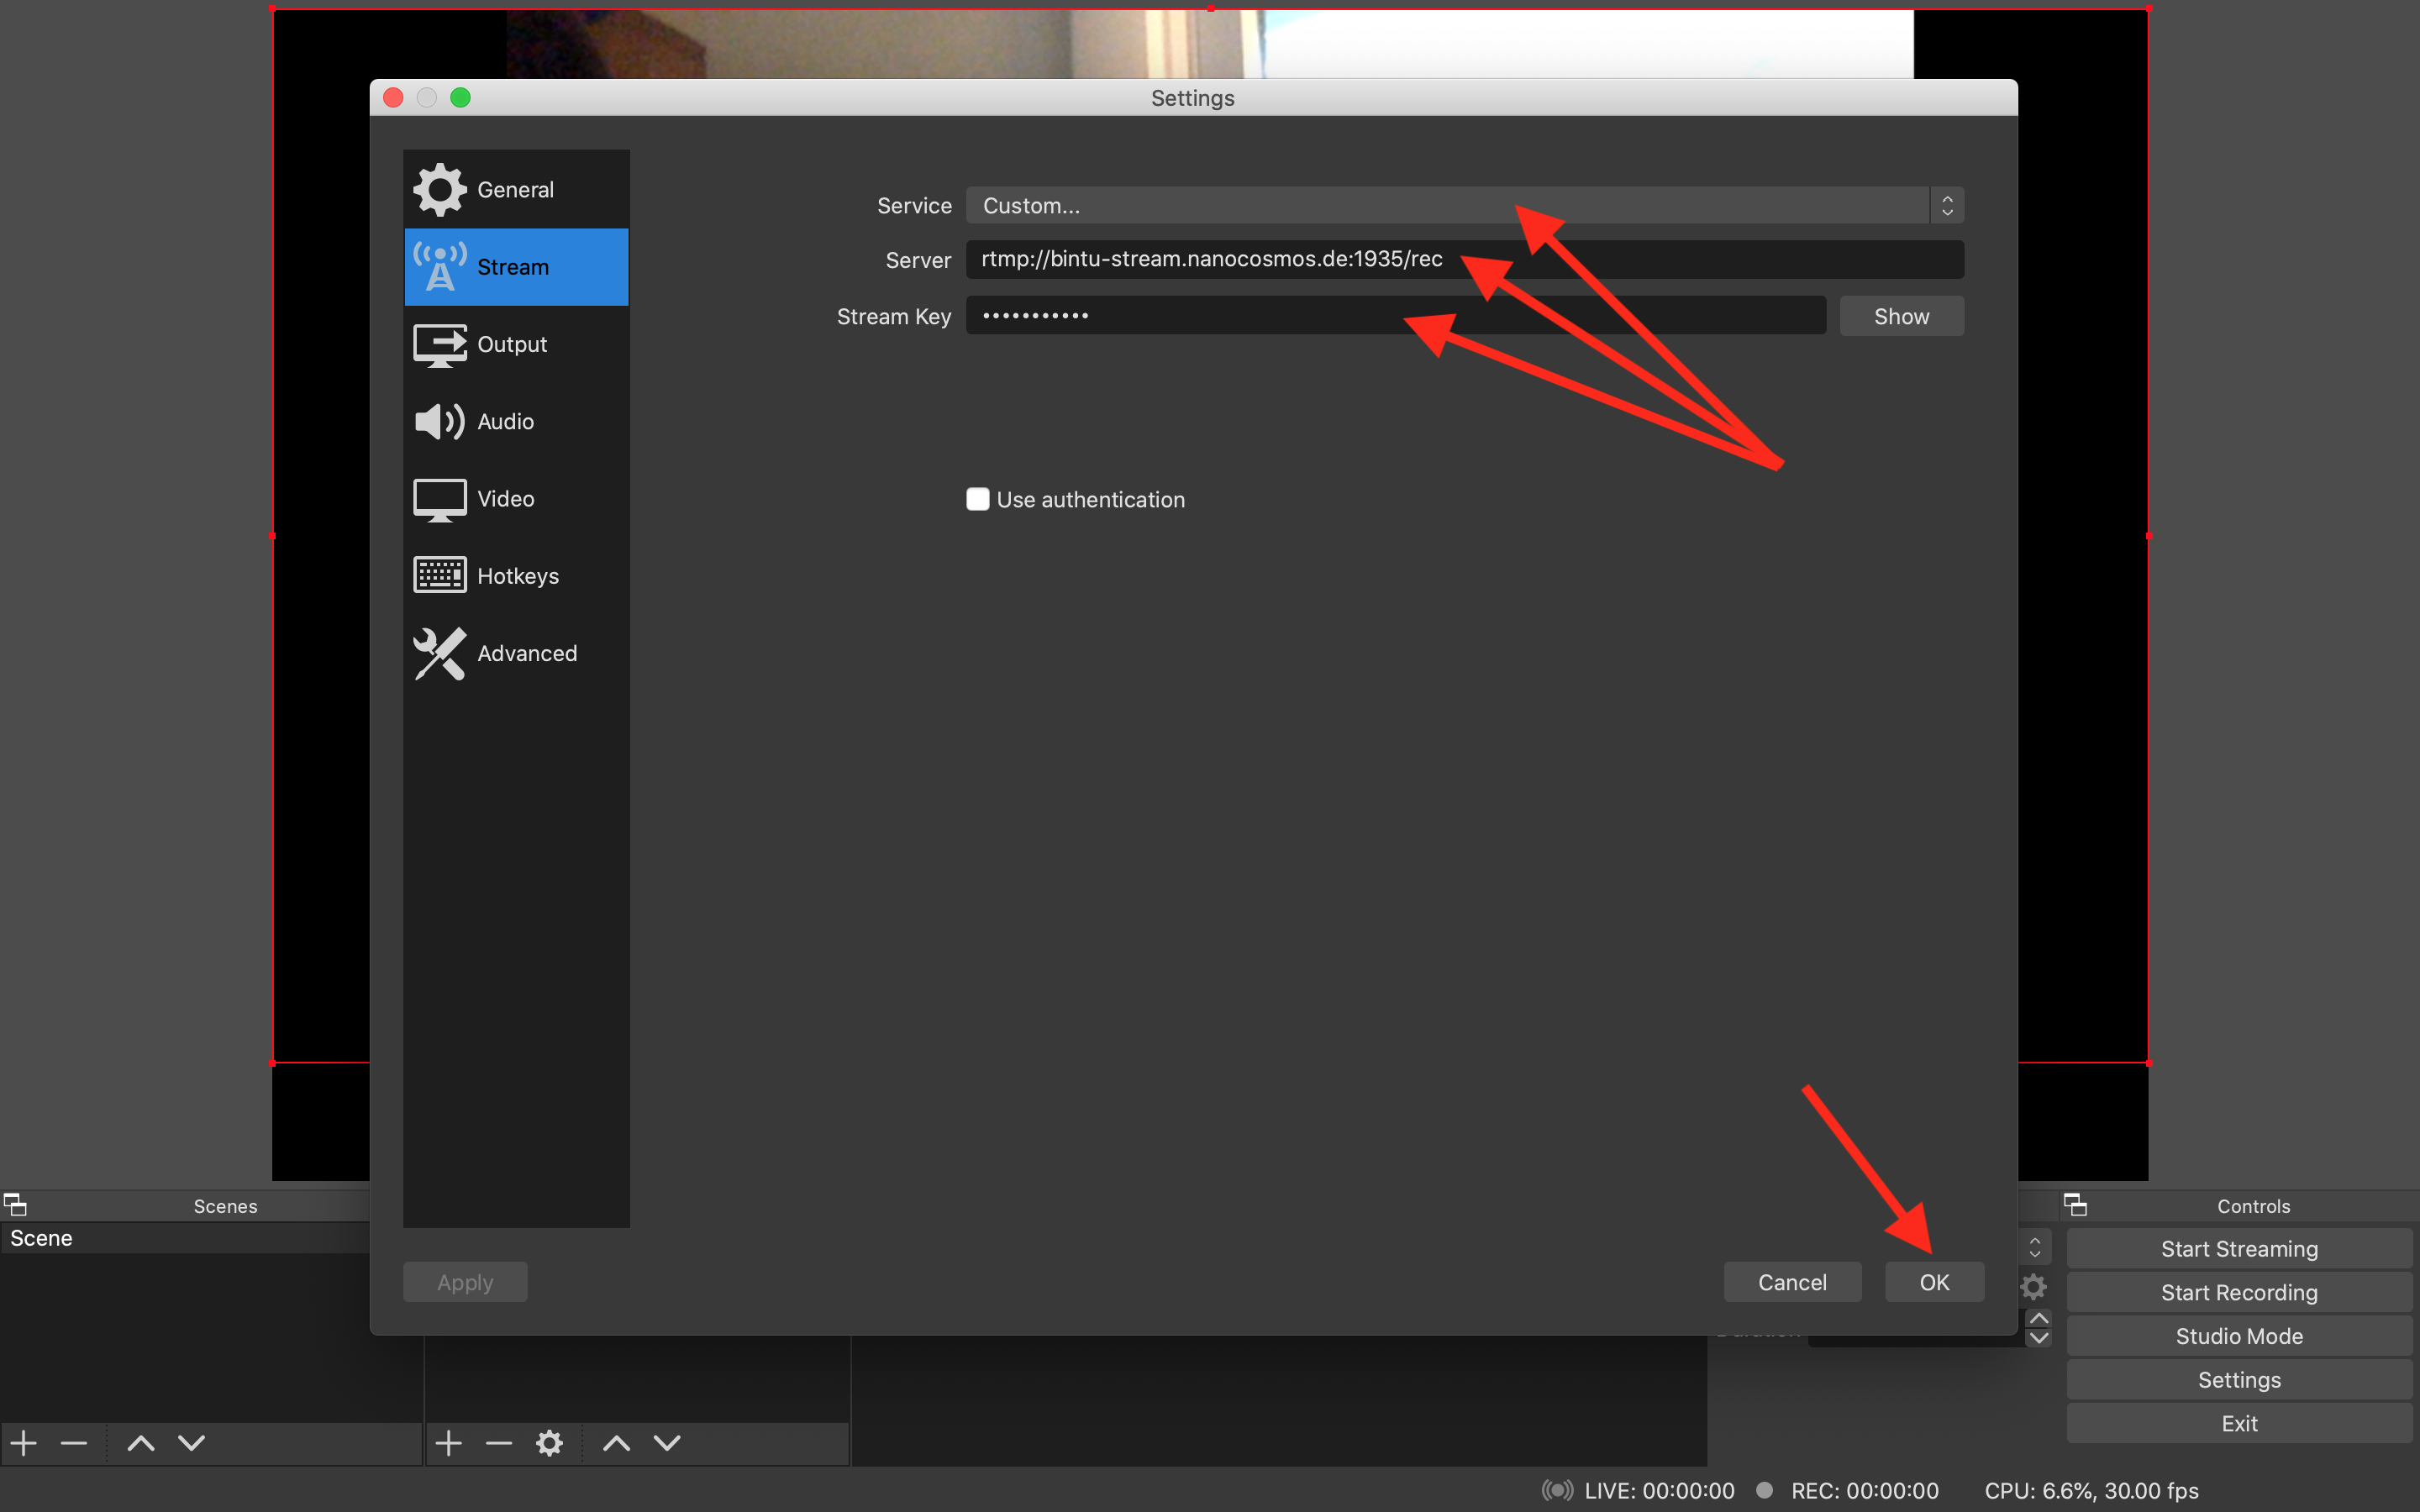
- Once you're ready to go live, click on "Start Streaming" in the lower right hand corner of the screen on OBS
- Congratulations - you're streaming live on PromoTix using OBS
- Go back to PromoTix and refresh the page. You should see "Event already streaming" at the top of the screen
Get started In minutes
Create engaging and dynamic live streams with OBS on PromoTix. Set up your account and start selling tickets to your virtual event right away.