All Posts

How to use the BBPOS Chipper 2X BT credit card terminal with PromoTix

(Last Updated 12/31/21)

IMPORTANT: the BBPOS Chipper 2X BT is no longer Stripe's most current credit card terminal. Firmware updates and support are limited. Please see our help center article on Stripe's latest credit card terminal, the Stripe M2 Reader.

Need a credit card terminal at your event so you can swipe, insert, and tap credit cards? The BBPOS Chipper 2X BT is a great option to use, and the following instructions will show you how to use it with PromoTix.

In addition to the convenience of using this credit card terminal, Stripe offers discounted payment processing rates for sales made using it. Please see here for details.

The BBPOS Chipper 2X BT credit card terminal is supported by both the iOS and Android versions of the PromoTix Organizer mobile app.

IMPORTANT: USD is the only currency currently supported by the BBPOS Chipper 2X BT.

1. Purchase a BBPOS Chipper 2X BT from Stripe

Stripe Purchase BBPOS Chipper 2X BT

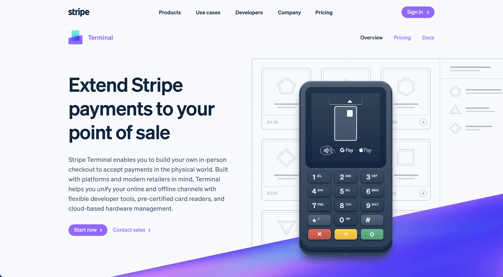
If you don't already own a BBPOS Chipper 2X BT, visit this URL to purchase one off of Stripe's website.

2. Turn the BBPOS Chipper 2X BT device on

Stripe-BBPOS-Chipper-2X-BT-Turn-On
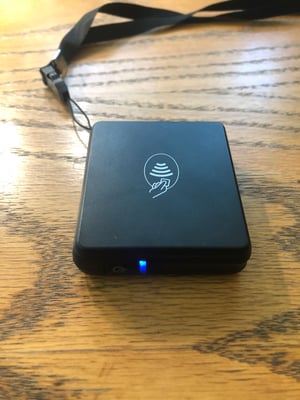
Once you've acquired a BBPOS Chipper 2X BT device, charge it and then turn it on. The blue light should be flashing occasionally, meaning that it is has not been connected to a device yet.

IMPORTANT: Do not connect via bluetooth to your BBPOS Chipper 2X BT from your device's settings, because then you will not be able to use it. The bluetooth connection has to be initiated from within the PromoTix Organizer mobile app.

3. Download & login to the PromoTix Organizer mobile app

Login to PromoTix Organizer App
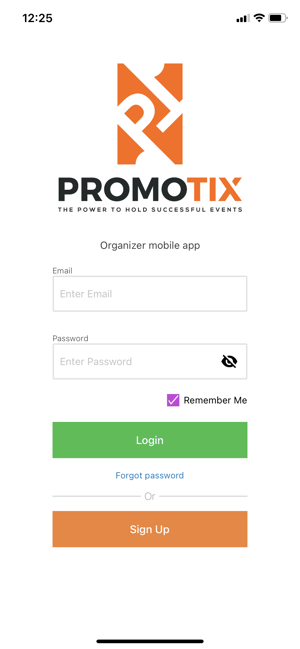
To download the PromoTix Organizer mobile app, please click the links below:

Once the app is downloaded, open it and login to your PromoTix event organizer account.

4. Select the event you would like to sell tickets for

PromoTix Organizer Select Event
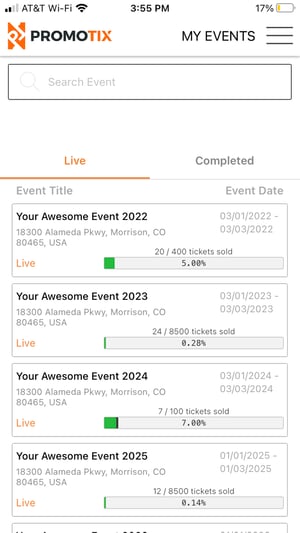
If you have multiple live events, select the event that you would like to accept credit cards for.

5. Tap on the "Sell Tickets" tab, and then continue through the checkout process

PromoTix Organizer Sell Tickets
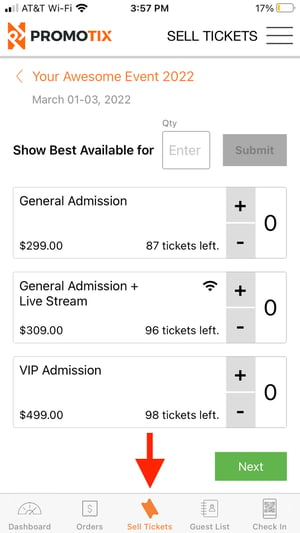
Tap on the "Sell Tickets" tab to add tickets to your cart, and then follow the steps through the checkout process.

6. On the "Payment" step, tap on the BBPOS icon

PromoTix Organizer BBPOS Icon

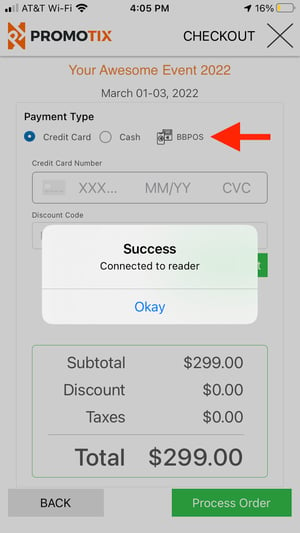
Once you are ready to accept payment, tap on the "BBPOS" icon with the credit card terminal in close range. You should see a success message once the terminal has been connected successfully.

NOTE: you will need to tap on the BBPOS icon each time before processing an order.

NOTE: if you do not see the BBPOS icon, check to make sure that your event's currency is set to USD. USD is the only currency currently supported by the BBPOS Chipper 2X BT.

7. Tap, insert, or swipe a credit card to complete the order

PromoTix Organizer Purchase Successful
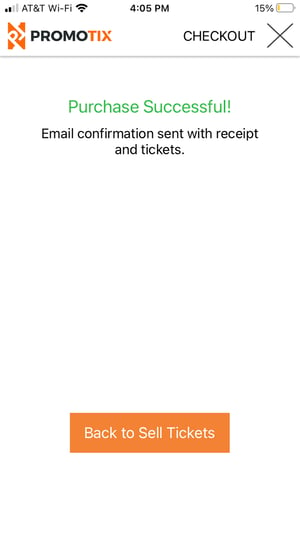
Tap, insert, or swipe a credit card using the BBPOS 2X BT credit card terminal. Once the payment has been processed, you will see the success message above.

Still Have Questions?

Contact Us

Sebastian Schulze
Sebastian Schulze
Sebastian is a client success specialist who has overseen the research, planning, and execution of all major product releases at PromoTix, Inc.

Related Posts

How to be and remain PCI compliant with payment processing data

(Last Updated 3/2/23) If your PromoTix account is using PromoTix Processing Pro for payment processing, you as the event organizer are responsible for PCI-compliance. If you are not in compliance a $34.95 monthly fee will be assessed to your account. To avoid this fee, you should follow the instructions below to pass PCI compliance. Please read below so you can make sure that your customers' payment information is being handled properly. 1. Login to the PromoTix Processing Pro Portal Visit this URL: https://www.promotixprocessing.com/ Login using your PromoTix Processing Pro credentials 2. Make a note of your "MID" and Merchant Address Zip Code Once logged in: Click on the Merchant Info tab in the drawer on the left side of the screen Make a note of your MID and the zip code associated with your Merchant Address. You will need both of these pieces of information later. 3. Visit the PCI compliance portal Visit this URL: https://go.pcicompliance.ws Click on the Create Login button in the middle of the screen 4. Complete the PCI Compliance registration process On the Registration step: Enter in your "MID" from step #2 into the Merchant ID field Enter in your zip code associated with your merchant address from step #2 into the Merchant Zip Code field Once done, click on the Register button On the Business Information step: Review all of the information and make edits where necessary Once done, click on the Continue button On the Terminal Information step: Write "PromoTix POS system" into the field Once done, click on the Continue button On the Pre-SAQ Questions step: Select Your Clients Customers For the question "What business type best describes your business?" For processing online ticketing with PromoTix choose the eCommerce option. For the question "Do you use an approved P2PE solution from the list of validated solutions?" Select I am unsure or we do NOT. For the question "Does your website redirect and/or white label all payment related pages to a PCI DSS validated 3rd party vendor such as Shopping Cart or Online Gateway?" Select Yes. For the question "Are the redirect controls regarding cardholder data on your website:" Select Controlled by your PCI DSS validated 3rd party vendor. For the question "Do you store credit card holder data electronically in any way?" Select We do NOT store card holder data electronically in any way. For the question "Is your Virtual Terminal access through?" Select Single Location For the question "Are there any external devices plugged in to your computer used while processing a credit card to capture or store cardholder data?" Select No external devices are used with my Virtual Terminal to capture, store, or process cardholder data. For the question "Is your credit card processing terminal/software/virtual terminal connected to any other systems or locations within your environment?" Select No, my processing terminal/software/virtual terminal is NOT connected to any other system or location within my environment. On the Summary step: Review the information and then click on the Accept & Continue button 5. Complete the Electronic Signature step Click on STEP 1 and follow the instructions on screen to complete this step. 6. Complete the SAQ Wizard Click on STEP 2 and follow the instructions on screen to complete this step. For Requirement 2: Click on the Show All button for an better view. For QUESTION 2.1 (A), select Yes. For QUESTION 2.1 (B), select Yes. Once done, scroll down to the bottom of the screen and click on the Next requirement button. For Requirement 6: Click on the Show All button for an better view. For QUESTION 6.2 (A), select Yes. For QUESTION 6.2 (B), select Yes. Once done, scroll down to the bottom of the screen and click on the Next requirement button. For Requirement 8: Click on the Show All button for an better view. For QUESTION 8.1.1, select Yes. For QUESTION 8.1.3, select Yes. For QUESTION 8.2, select Yes. For QUESTION 8.2.3 (A), select Yes. For QUESTION 8.5, select Yes. Once done, scroll down to the bottom of the screen and click on the Next requirement button. For Requirement 9: Click on the Show All button for an better view. For QUESTION 9.5, select Yes. For QUESTION 9.6 (A), select Yes. For QUESTION 9.6.1, select Yes. For QUESTION 9.6.2, select Yes. For QUESTION 9.6.3, select Yes. For QUESTION 9.7, select Yes. For QUESTION 9.8 (A), select Yes. For QUESTION 9.8.1 (A), select Yes. For QUESTION 9.8.1 (B), select Yes. Once done, scroll down to the bottom of the screen and click on the Next requirement button. For Requirement 12: Click on the Show All button for an better view. For QUESTION 12.8.1, select Yes. For QUESTION 12.8.2, select Yes. For QUESTION 12.8.3, select Yes. For QUESTION 12.8.4, select Yes. For QUESTION 12.8.5, select Yes. For QUESTION 12.10.1 (A), select Yes. Once done, scroll down to the bottom of the screen and click on the Finish button. On the following screen, click on the Click Here for Annual SAQ Validation button. Scroll down and then click on the Return To Dashboard button. 7. Verify email After you have completed the SAQ wizard, scroll down until you see the VERIFY EMAIL button. If there is a red "warning" icon to the right of the button, click on the VERIFY EMAIL button. On the following screen, if necessary, click on the SEND/RE-SEND VERIFICATION EMAIL button to resend the verification email to the email address on file. NOTE: if your email address is not correct, you can also click on the Edit Email Now button to update your account's email address. Click on the link in the verification email sent to your inbox to verify your email address. Still Have Questions? Contact Us

How to manage your event after publishing

(Last Updated 12/20/22) Here's how you manage your event after it's been published! 1. Click on your event to manage "Event settings" tab Click on the event you would like to manage from the dashboard. TIP: You can also click on the event on the left hand menu 2. Managing the "Details" tab *Details - you can edit your Event title and description, add photos, hashtags and embed a custom YouTube video - For more instructions on how to embed your YouTube video, click here. Once you're done making changes, don't forget to click the Save & continue button to save your changes and move to the next step.   3. Managing the "Where & When" tab *Where & when - Edit date(s) and time(s) of your event. NOTE: once your event is published the time zone setting cannot be changed.   4. Managing the "Ticket Types" tab * Ticket types - create and adjust ticket types, quantity, price and other options. A πŸ‘‰Currency cannot be changed after initial set up B πŸ‘‰ Add a title for your ticket type C πŸ‘‰ Set the available ticket inventory for your ticket type D πŸ‘‰ Set a price for your ticket type E πŸ‘‰ Show additional settings (see below) F πŸ‘‰ Duplicate your ticket type G πŸ‘‰Delete your ticket type H πŸ‘‰ Create an add-on    TIP: Add-ons are similar to ticket types however they will not affect your attendance numbers. For example, create add-ons for products like VIP upgrades, parking passes, and merchandise items. You can also create multiple different variations of a single add-on (for example, different sizes of a T-shirt). I πŸ‘‰ Create a new ticket type Here are the additional settings you can adjust for each of your ticket types: J πŸ‘‰ If checked, your ticket type description will not be shown publicly, but it will be visible to you K πŸ‘‰ If checked, the number of remaining tickets available for this ticket type will be shown publicly L πŸ‘‰ If checked, ticket holders will be allowed to safely transfer this ticket type to others using PromoTix M πŸ‘‰ If checked, your ticket type will not be shown publicly, but it can still be sold by you N πŸ‘‰ If checked, your ticket type will only be shown publicly to customers who enter in the password set by you O πŸ‘‰ If checked, you can edit the minimum and maximum number of this ticket type that can be purchased at a time P πŸ‘‰ The minimum number of this ticket type that can be purchased at a time Q πŸ‘‰ The maximum number of this ticket type that can be purchased at a time R πŸ‘‰ Upload an image for your ticket type to display during the checkout process (optional) S πŸ‘‰ Add a ticket description to display during the checkout process (optional) T πŸ‘‰ Decide on when this ticket type will go on sale. You can either choose a specific date & time, or have this ticket type go on sale automatically once another ticket type goes off sale U πŸ‘‰ Set the date when this ticket type will go on sale V πŸ‘‰ Set the time when this ticket type will go on sale W πŸ‘‰ Set the date when this ticket type will go off sale X πŸ‘‰ Set the time when this ticket type will go off sale TIP: by default, in-person ticket types on PromoTix are automatically scheduled to go off-sale when your event ends. When your event starts, if you would like to sell tickets at the door (usually for a higher price), then follow these steps: Copy the ticket types that you plan on selling during the event and title them appropriately (ex. "Day-Of-Show: General Admission"). Set these ticket types to "Private" using the "Options" menu for each ticket type. Manually schedule all other ticket types to go off-sale when your event starts using the "Options" menu for each ticket type. 5. Managing the "Payments" tab A πŸ‘‰ Check this box if you would like to allow your customers to request refunds through the PromoTix system. Note that you always have the power to issue refunds regardless if this box is checked or not. B πŸ‘‰ Enter in your refund policy (recommended) C πŸ‘‰ Enter in any terms & conditions that you have (recommended). Note that your customers will have to agree to these terms & conditions before placing their orders. D πŸ‘‰ Click this box is you would like to include tax on each ticket. E πŸ‘‰ Click this box if you would like to pass on the service fees to the ticket buyer. F πŸ‘‰ Click this box to add a custom service fee that you keep. G πŸ‘‰ Enter the email address that ticket buyers can contact for support. H πŸ‘‰Connect a Stripe account so you can get paid! (required if selling paid tickets). Your funds will be deposited into your Stripe account instantly when orders are placed. For more detailed instructions on connecting your Stripe account to PromoTix, please click here. I πŸ‘‰Click here to activate PromoTix Processing Pro to lower your credit card processing rates to 2.75% + $0.25/transaction. NOTE: the Professional package is required in order to activate PromoTix Processing Pro. J πŸ‘‰Click the boxes to connect to Google Pay, Apple Pay and Klarna Pay. For more information on on connecting your Klarna account, click here. Once you're done, make sure you click "Save & continue". 6. Managing the "Advanced" tab On the Advanced tab you have four additional tabs: *Checkout - here you can set custom checkout options Time limit to purchase πŸ‘‰ Here you can set  a time limit in which the ticket buyer has to complete their purchase during the checkout.  Customize ticket availability message πŸ‘‰ Here you can create a custom message to display on your event page when tickets are no longer available. Check in questionnaire πŸ‘‰ Enable this feature if you need to trigger a series of questions to ask attendees upon arrival to your event. Enable best available feature πŸ‘‰ When enabled, a "best available" widget will display in your checkout process to help attendees select the best tickets. Customize registration πŸ‘‰  here you can decide what data is to be collected from each ticket buyer. (ex. - name, email, phone, address, gender, date of birth) Embed checkout on your website πŸ‘‰ here you can copy the checkout code to embed on your website. For more information on this, please click here. *Analytics - Here you can link ad tracking and event analytics. Ad tracking πŸ‘‰  Here is where you will enter your Facebook Ads Pixel ID, Google AdWords UID and your Google AdWords Conv Label to track conversions from ads Event page analytics πŸ‘‰  Here is where you will enter your Google Analytics ID, Google Analytics 4ID, AdRoll Pixel ID and your AdRoll Adv ID to track conversions from ads *Email - Here you will create a custom email that will go out to your attendees when they purchase tickets to your event. You can also create a seperate email will call ticket pickup instructions.  *Event Settings - Here you will find your custom URL and QR codes for your event. Customize your event URL πŸ‘‰ Here you can customize the URL for your event. Download customized QR code πŸ‘‰ Here you can download a QR code for your event URL (for example, to include on event graphics and fliers). Hide event end time πŸ‘‰ Here you can choose to hide your event's end time or not. Tickets starting price πŸ‘‰ By default your event page will display "Tickets starting at" followed up the cheapest ticket type or add-on that you've created. If you need to customize this value, you can do so here.  Customize buy tickets button πŸ‘‰ Here you can rename the default "Buy tickets" title on the button on your event page. Save & continue to save. Still Have Questions? Contact Us

  • 16 min read
  • Dec 21, 2022 4:45:17 PM

How to activate Klarna as a payment method in Stripe

(Last updated 12/27/22) Klarna is a payment method offered by Stripe that allows your customers to pay for their purchases over time, while you get paid upfront for the entire purchase amount by Klarna. Klarna offers three different ways for customers to pay: 4 Installments Pay in 30 days Financing (6 - 24 months) 1-3 of the above payment options will be available to your customers based on a few factors. In some cases, no options will be available if the order amount is too great ($1,000.00 USD or more in most cases). For more information, click here. For accounts based in the United States: Financing will be not be immediately made available once Klarna has been activated in your Stripe account. If you would like to enable Financing after you have followed these instructions to activate Klarna in your Stripe account, then please contact Stripe support using this link and have the following information on hand: AOV (average order value) Annual expected Klarna volume (% of orders you think will use Klarna x AOV x annual tickets sold) Your Market (US or UK) Whether you qualify for Klarna discounted pricing (Only accounts with $1M+ in Klarna volume) For accounts based in the United Kingdom: Financing will be not be immediately made available once Klarna has been activated in your Stripe account. If you would like to enable Financing after you have followed these instructions to activate Klarna in your Stripe account, you will need to first register with the FCA and then contact Stripe support using this link and have the following information on hand: AOV (average order value) Annual expected Klarna volume (% of orders you think will use Klarna x AOV x annual tickets sold) Your Market (US or UK) Whether you qualify for Klarna discounted pricing (Only accounts with $1M+ in Klarna volume) For accounts based in Germany, Austria, Finland, Sweden and Norway: Financing will be immediately made available once you have activated Klarna in your Stripe account. 1) Login to your Stripe account Visit https://stripe.com and login to your Stripe account by clicking on the "Sign in" button in the top right hand corner of the screen. 2) Navigate to your account settings Click on the gear icon in the top right hand corner of the screen to access your account settings. 3) Click on "Payment methods" Click on "Payment methods" underneath the "Payments" section. 4) Turn on Klarna in your Stripe account Underneath the "Buy now, pay later" section, click on the "Turn on" button to the right of Klarna. Please note that Klarna may be put into a "Pending" state. If this happens, simply wait for Klarna to be approved in your Stripe account before proceeding to the next step (normally approvals happen within a few days). If you need to reach out to Klarna's customer support team to check on the status of your approval, you can do so here. 5) Activate Klarna as a payment method on your PromoTix event Once Klarna is activated in your Stripe account, you can activate Klarna as a payment method on any of your PromoTix events that are also connected to your Stripe account. Login to your PromoTix account using a web browser Click on your event Click on the Payment tab in the drawer on the left side of the screen Check the Klarna pay box and then click the Save & continue button Still have questions? Contact Us